How to choose where to place security cameras comes down to three things: which entrances people actually use, what each candidate spot can genuinely see, and whether you tested that view at night before drilling. Start with the doors and approach paths, aim each camera downward from roughly 8 to 10 feet (2.5 to 3 m) outdoors, and confirm faces are readable rather than just dots on a wall. Most regret in home security camera placement comes from mounting first and aiming later.
This guide walks the whole decision: what to gather before you buy anything, where cameras earn their keep, which spots waste hardware, and how to run a cheap validation pass that costs nothing but masking tape and an afternoon. It works for houses, apartments, rentals and small shopfronts.
Table of Contents
- 1What You Need
- 2Step-by-Step: How to Choose Where to Place Security Cameras
- 3How to choose where to place security cameras for each critical area
- 4Map blind spots and overlapping coverage
- 5Check lighting, privacy, and weather exposure
- 6Test before you mount the cameras
- 7How to test before you commit to a number of cameras
- 8Common Mistakes
- 9Frequently Asked Questions
- 10How many security cameras does most homes need?
- 11Should I place a security camera at every door and window?
- 12How high should outdoor security cameras be mounted?
- 13Do I need indoor security cameras if I have outdoor cameras?
- 14How can I prevent security cameras from capturing my neighbors’ property?
- 15What is the best angle for identifying faces at a doorway?
- 16Conclusion
What You Need
A rough floor plan is the single most useful thing you can bring to this. Sketch the property from memory or from a survey, mark every door you use, and mark where valuables sit. Two pages of scrap paper will save you from a camera pointed at a blank garden wall.
Then read the field of view number on each camera’s spec sheet. A cheap wide-angle model often gives you 110 to 130 degrees, which is wide enough to cover a porch but narrow enough to keep faces reasonably large in frame. A 180-degree fisheye squeezes the entire scene into a curved edge, so most of the pixels sit on the two walls beside your target. People running multiple cameras in forums and on r/SecurityCamera almost always regret the ultra-wide choice first.
- A floor plan or overhead photo with doors, windows, gates and parking marked.
- A walkthrough at two times of day — once in daylight, once at night, so you see what the lighting does.
- Field of view and identification distance from the spec sheet, in degrees, plus night vision range in feet.
- Masking tape or painter’s tape for a full-size template of the camera body.
- Your phone, to run the camera app and check the live view before anything is drilled.
- A tape measure, because mounting height and the distance to the subject are what decide whether a face is identifiable.
Camera type changes what you can do with a spot. Indoor cameras work in ordinary rooms and need no weather rating. Outdoor cameras need an IP66 or IP67 rating, a vandal-resistant housing if the mount sits below shoulder height, and cable routing that keeps water out. Pan-tilt-zoom cameras are flexible but only useful if you can keep them pointed at one priority area; a fixed bullet or turret camera aimed well beats a swivelling one that drifts.
Wired versus wireless placement matters too. PoE cameras need a cable run back to a switch, so the real constraint is not the lens but whether you can get a cable to the spot without drilling a hole through a brick facade you would rather not touch. Wireless cameras only care about signal, and corners of older houses are notorious dead zones. Check signal strength at the intended height, not at floor level.
Step-by-Step: How to Choose Where to Place Security Cameras
The process below takes an afternoon on paper and another hour of testing. It works because it separates the deciding questions: what to watch, from where, and whether the view works after dark.
How to choose where to place security cameras for each critical area
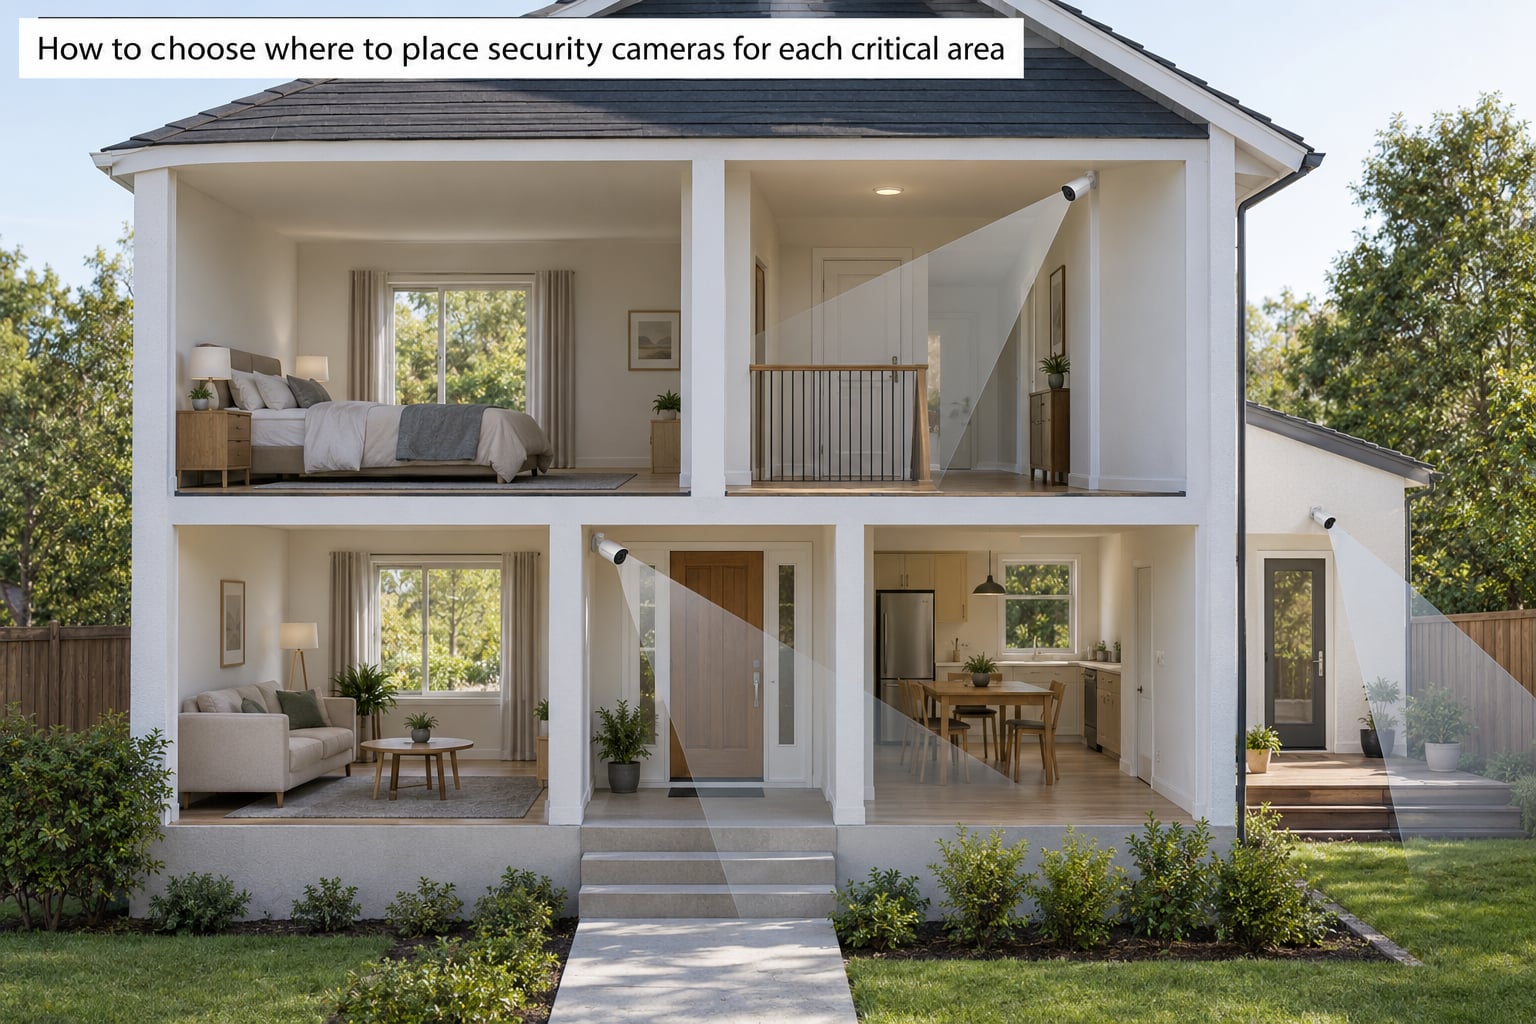
Work through this list in order of likelihood. Every home I have looked at has the same shape of risk, and the entry points matter far more than the driveway.
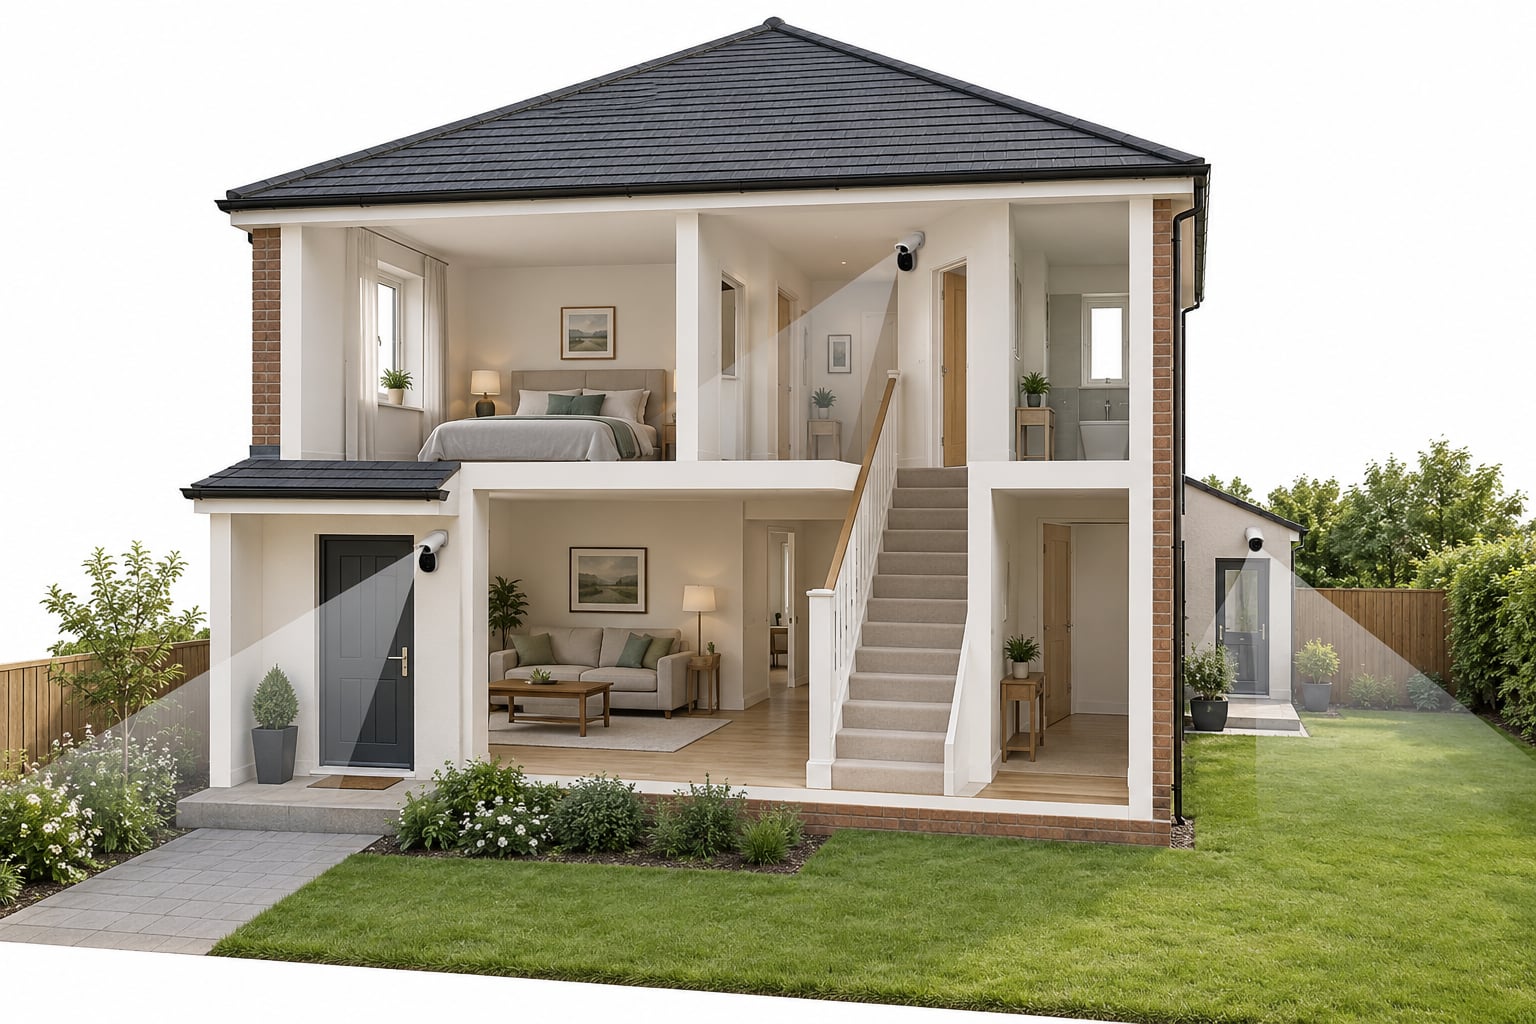
Front door and porch. Mount beside or above the door rather than directly on it, at 8 to 10 feet (2.5 to 3 m), angled down about 30 degrees. The downward tilt is what turns a blob of shoulders into an identifiable face. This spot also catches parcel theft, which is why it tops most owners’ priority lists.
Back and side doors. These get less attention than the front and matter more, because a side gate or utility door is often the only reachable path that is not visible from the street. Cover every exterior door you actually use, and check whether a neighbour’s fence or a parked van hides the approach.
Driveway and parking. Aim for the vehicle’s path and the driver’s door, not the whole street. A longer lens here beats a wide one, because you want the plate and the person beside the car large enough to read. Remember that number plates sit at a fixed height, so keep the camera near that height or tilt slightly upward from further back.
Garage and outbuildings. Garages hold tools, bikes and vehicles, and often have a shared wall with the house. A camera inside a detached garage needs its own power and weather cover. Mount it so it captures the doorway, not the ceiling rafters.
Ground-floor windows. Roughly a quarter of residential entries happen through a first-floor window, so cameras covering approaches and side walls earn their cost here. Do not mount inside the glass unless you have dealt with glare, which is covered later.
Hallways and stairways. Indoors, this is the highest-value placement in the house. A camera high in the corner of a hallway or above the stairs, looking down the run, shows where an intruder must pass and what they are carrying. The ceiling corner is the standard community answer because it fills the length of the corridor with one unit.
Living rooms, kitchens and shared spaces. Indoor coverage works best where movement happens. A corner that faces the main entrance catches people entering and moving through. Set the resting angle of any pan-tilt camera toward the door, since it will drift from its factory default if you never reset it.
Side yards and low-visibility gaps. The narrow passage between house and fence is a classic blind spot. A small wide-angle unit under an eave covers it well, provided it is out of reach and lit enough at night.
Map blind spots and overlapping coverage
Draw your candidate cameras on the floor plan, then for each one draw the approximate cone it would cover. Wide-angle lenses cover a wide arc but a short distance; narrow lenses cover a long corridor. Comparing the two on paper tells you immediately where your ground is uncovered.
Mark every uncovered area in pencil. Most households end up with three or four genuine blind spots: behind the garage, the far corner of the back garden, the passage beside the house, and the ground behind a parked car. Those are the gaps worth fixing.
Overlap is not automatically wasted. Two cameras seeing the same doorway from different angles is useful, because a blocked view from one angle is covered by the other. What wastes hardware is two wide cameras pointed at the same open patch of lawn with nothing in between. Trim those cones rather than buying another unit.
Be honest about resolution. Identifying a face needs far more pixels per foot of subject than noticing that someone was there. A camera that covers an entire 60-foot driveway may produce footage where a person is 40 pixels tall, which is enough for a motion alert and useless for a claim. Move the camera closer or use a longer lens instead of covering more ground.
Check lighting, privacy, and weather exposure
Test each candidate position after dark, because that is when footage is actually reviewed. Infrared cameras do see at night, most of them to somewhere between 15 and 40 feet depending on the model, but infrared creates its own failure modes. It bounces off shiny surfaces as a bright haze, lights up spider webs and insects in a way daylight never would, and turns anything past its range into a black silhouette.
Watch for glare too. A camera pointing toward a bright window, a street light or a sunset gets a backlit frame where the subject is dark and the background is white. Aim slightly away from the light source, or pick a camera with genuine wide dynamic range. The fix is nearly always to change the angle rather than to add lighting.
Use privacy zones to exclude neighbours’ windows, a neighbour’s yard and any shared walkway where people expect to be private. Masking those areas costs you nothing and removes most of the reason people get into disputes about cameras. If you record audio, remember the rules vary by state and a number of them require consent from everyone in a conversation.
For weather, treat the IP rating as the first filter and the cabling as the second. Every exposed run needs a drip loop so water runs off the cable rather than into the camera, and any joint needs to sit inside a weatherproof box. On brick or render walls, a conduit run along the existing mortar line hides cabling far better than surface cable.
Test before you mount the cameras
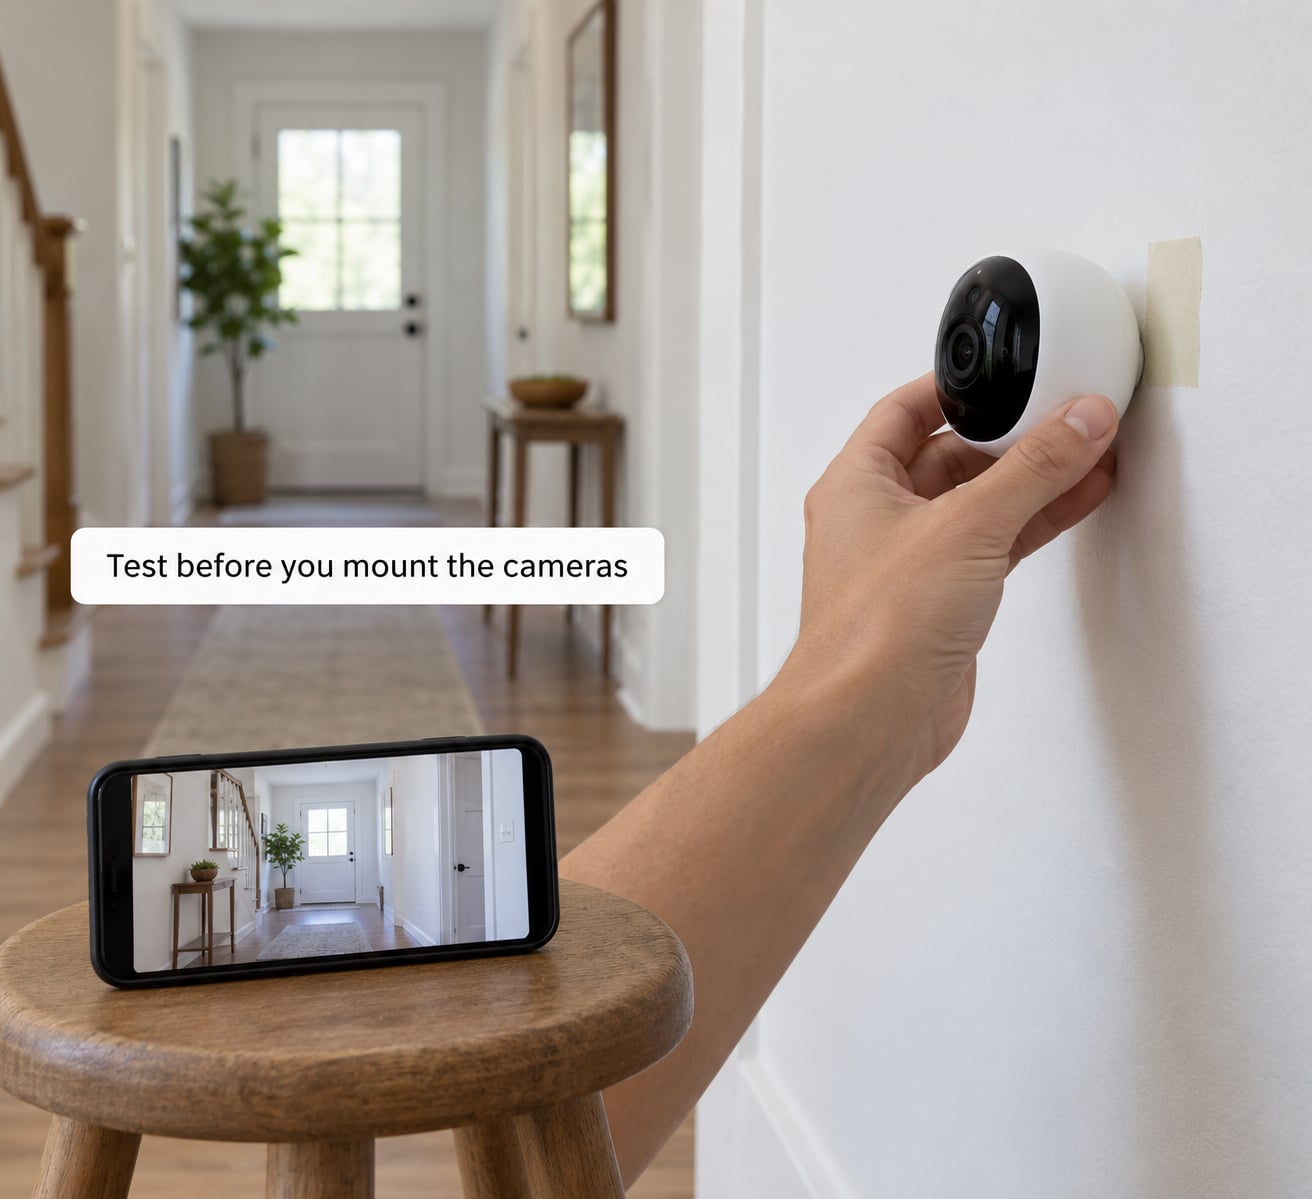
This is the step people skip, and it is the whole reason a bad mount happens. Masking tape on the wall is the template; holding the camera in place and checking the app is the proof.
Tape a rectangle the size of the camera body where you think it should go. Hold the camera or a phone against it and look at the live view. Walk the route a visitor would take: approach the door, stand where a visitor stands, knock, turn away. If you cannot recognise a face at that distance, move the camera closer or change the lens.
Then repeat at night with the infrared on. Look for the bright haze of infrared reflection from an eave or a window, and check whether the subject lands inside the usable range. This is also when you find out whether your phone has usable Wi-Fi signal at that exact spot and height.
Finally, test motion zones. Walk the path in a wide arc rather than straight at the camera, because many people walk the approach at an angle the detection zone never covered. Record a clip, play it back, and confirm the clip is sharp.
How to test before you commit to a number of cameras
Count entry points first, then add coverage for the two or three areas that hold something worth taking. A typical small home needs four to six outdoor units for full perimeter coverage; a two-camera setup is a reasonable starting point if you cover the front door, the back or side door, and one wide view of the driveway.
For apartments and rentals, the math is smaller. A doorbell camera at the main entry plus one indoor camera covering the door and hallway covers most of the useful ground. Check your lease and your building’s rules before mounting anything on shared walls, and prefer an indoor camera over one aimed at a corridor you do not control.
Common Mistakes
Mounting too high to see faces. Above roughly 10 feet, a camera angled down produces tops of heads. The fix is to lower the camera and keep the downward tilt between 20 and 35 degrees.
Pointing straight at a bright window or doorway. The frame blows out and the person becomes a silhouette. Turn the camera away from the light source by 15 to 20 degrees, or add a camera with wide dynamic range.
Mounting behind glass to keep it tidy. Interior windows reflect the room’s own light back at the lens, and double-pane glass adds a second reflection. Mount outside, or press the lens to the glass, angle the hood over it, and disable the interior light behind it.
Using a 180-degree fisheye for a doorway. Most of the frame becomes two adjacent walls and the image softens toward the edges. Use a standard wide lens and get closer instead.
Ignoring the side approach. Owners cover the front and back and forget the gate, the side door and the passage beside the garage. Walk the whole perimeter at night and note where you would not want to approach.
Covering too much ground with one camera. A camera that sees everything records nothing useful. Split the area across two cameras rather than pushing one lens wider.
Forgetting weather protection. Unsealed cable entries and joints are the most common cause of a camera failing months after install. Add a drip loop, seal every entry point, and confirm an IP66 or IP67 rating for anything exposed.
Recording areas where people expect privacy. A camera aimed across several neighbours’ gardens is the fastest route to a dispute. Set privacy zones and, for indoor units, keep them out of bathrooms and private bedrooms.
Five habits that get it right more often than not: write the plan down before you buy, test every position with tape, check each view at night, aim for the approach path rather than the door itself, and count entry points before deciding how many cameras you need.
Frequently Asked Questions
How many security cameras does most homes need?
A small home usually needs four to six outdoor cameras for full perimeter coverage, but a two-camera setup covering the front door, the back or side door and one wide view of the driveway handles most common cases. Add cameras for the garage, outbuildings or a side passage as those become priorities. Count entry points first, then decide.
Should I place a security camera at every door and window?
Cover every exterior door you actually use, since side and utility doors are frequently the least watched entry points. Ground-floor windows matter too, because a meaningful share of residential entries happen through them. You do not need a camera on every window, only on those with reachable ground, visible from the street or holding something worth taking.
How high should outdoor security cameras be mounted?
Roughly 8 to 10 feet (2.5 to 3 m) is the range most people land on, which keeps a camera out of easy reach while still capturing a face. Mount at or above 7 feet if you want it tamper-resistant, and add a vandal-resistant housing for lower spots. Above 10 feet, angle the camera down more gently or faces turn into tops of heads.
Do I need indoor security cameras if I have outdoor cameras?
Outdoor cameras cover approaches, but they cannot follow anyone through a door. One indoor camera in a hallway corner looking down toward the entrance captures movement through the house and is usually the highest-value single unit indoors. More indoor cameras add detail only where people actually pass, such as a stairway or a shared living space.
How can I prevent security cameras from capturing my neighbors’ property?
Use the privacy masking zones most cameras offer to block neighbouring windows, gardens and shared walkways, then confirm the masked areas really are blacked out in playback. Angle cameras away from the property boundary where you can, since masking is a software setting that can change after an update. Record audio only where you have a legal basis to do so.
What is the best angle for identifying faces at a doorway?
Mount beside or above the door rather than on it, angle the camera down roughly 20 to 35 degrees, and keep it close enough that a face fills a useful share of the frame. Avoid shooting straight across a bright doorway, which backlights the subject. Test by standing where a visitor stands and checking whether you can recognise your own face in the live view.
Conclusion
Start by walking your property twice, once in daylight and once after dark, and marking every door, gate and path someone would use to reach the house. Those marks are your shortlist. Then tape a template at each spot, check the live view from where a visitor stands, and confirm it still works under infrared before you drill a single hole. Placement decides whether the footage is worth having, and that decision costs nothing to get right.