A running toilet is almost always one of four things: the flapper that won’t seal, a lift chain set wrong, water sitting too high because the float is mis-adjusted, or a fill valve that never closes. Knowing how to fix a running toilet means checking those four in that order, and most fixes take under 15 minutes with a screwdriver and a pair of pliers. You also stop the water in about ten seconds if you need to buy a part first.
The order matters because it saves money. Press the flapper down while the toilet is running: if the sound stops, you have found the problem, and you can buy a flapper instead of rebuilding the whole tank. If it keeps running, the fault is upstream in the fill valve or float. Everything in this guide works on standard two-piece toilets and on button-flush and dual-flush models, and I’ve checked the part guidance against current designs for 2026.
Table of Contents
- 1What You Need
- 2Step-by-Step: How to Fix a Running Toilet
- 31. Remove the Tank Lid and Check the Water Level
- 42. Inspect the Flapper and Flapper Chain
- 53. Test or Replace the Fill Valve
- 64. Adjust or Replace the Float
- 75. Check the Overflow Tube and Flush Valve
- 86. Inspect the Handle and Flush Mechanism
- 97. Test the Repair and Check for Leaks
- 10Common Mistakes
- 11Frequently Asked Questions
- 12Why is my toilet running constantly after flushing?
- 13How much water does a running toilet waste?
- 14Why does it take so long for the water to stop running after a flush?
- 15Why did my toilet start running after I replaced the flapper?
- 16Can I fix a running toilet with a button flush or dual flush?
- 17Is a running toilet an emergency that needs a plumber now?
- 18Conclusion
What You Need
Most running toilets are fixed with a short list. Grab a flathead and a Phillips screwdriver, adjustable pliers, a pair of wire cutters or small snips, and a wet/dry vacuum or a cup and sponge for draining the tank. Lay an old towel down first — the tank lid is heavy porcelain and it chips tile if you set it down hard.
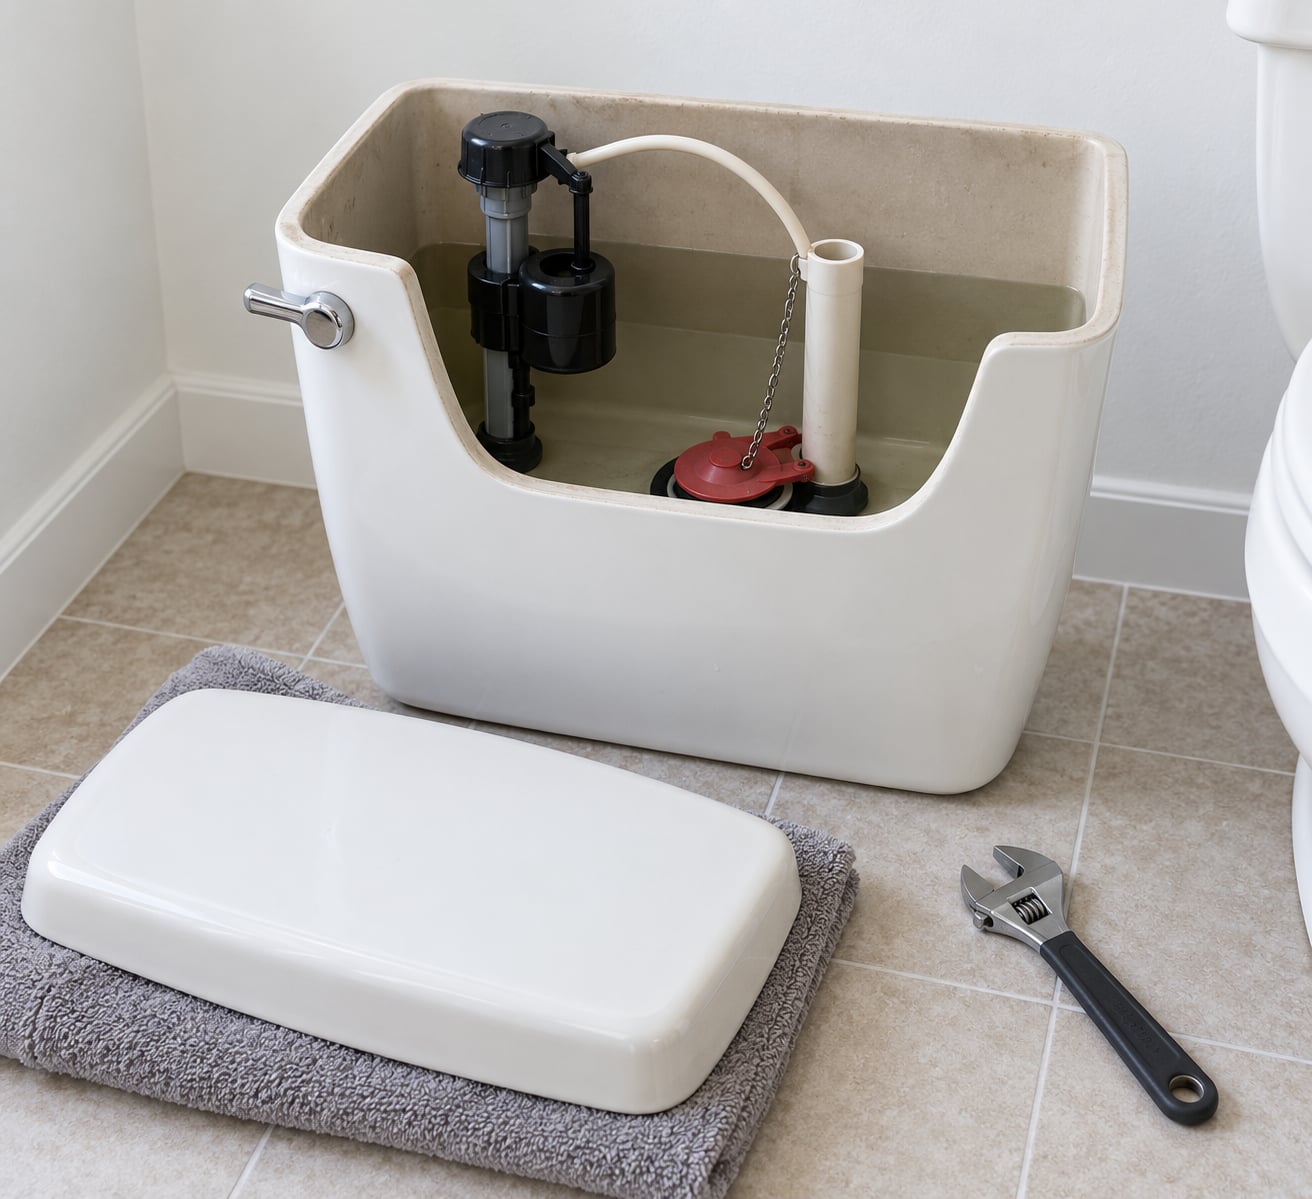
Before you buy anything, look down into the tank and identify the parts by name. You should see the flapper (the rubber or plastic seal at the bottom of the tank covering the flush valve opening), the lift chain running from the flush handle to that flapper, the fill valve or ballcock (the tall valve that refills the tank), the float or float cup that rises with the water, the small refill tube that tops up the bowl, and the open-topped overflow tube that acts as a safety drain.
That last part matters more than most people expect. The water level in a healthy tank sits about half an inch to one inch below the top of the overflow tube, and the fill valve carries a critical level mark that marks that same line. Knowing your toilet’s type tells you what part to buy: a tank with a visible rubber flapper takes a flapper, while a flush-valve-mounted button or dual-flush unit usually needs a flapperless seal or a canister, and a Kohler-style canister toilet has no flapper at all.
Step-by-Step: How to Fix a Running Toilet
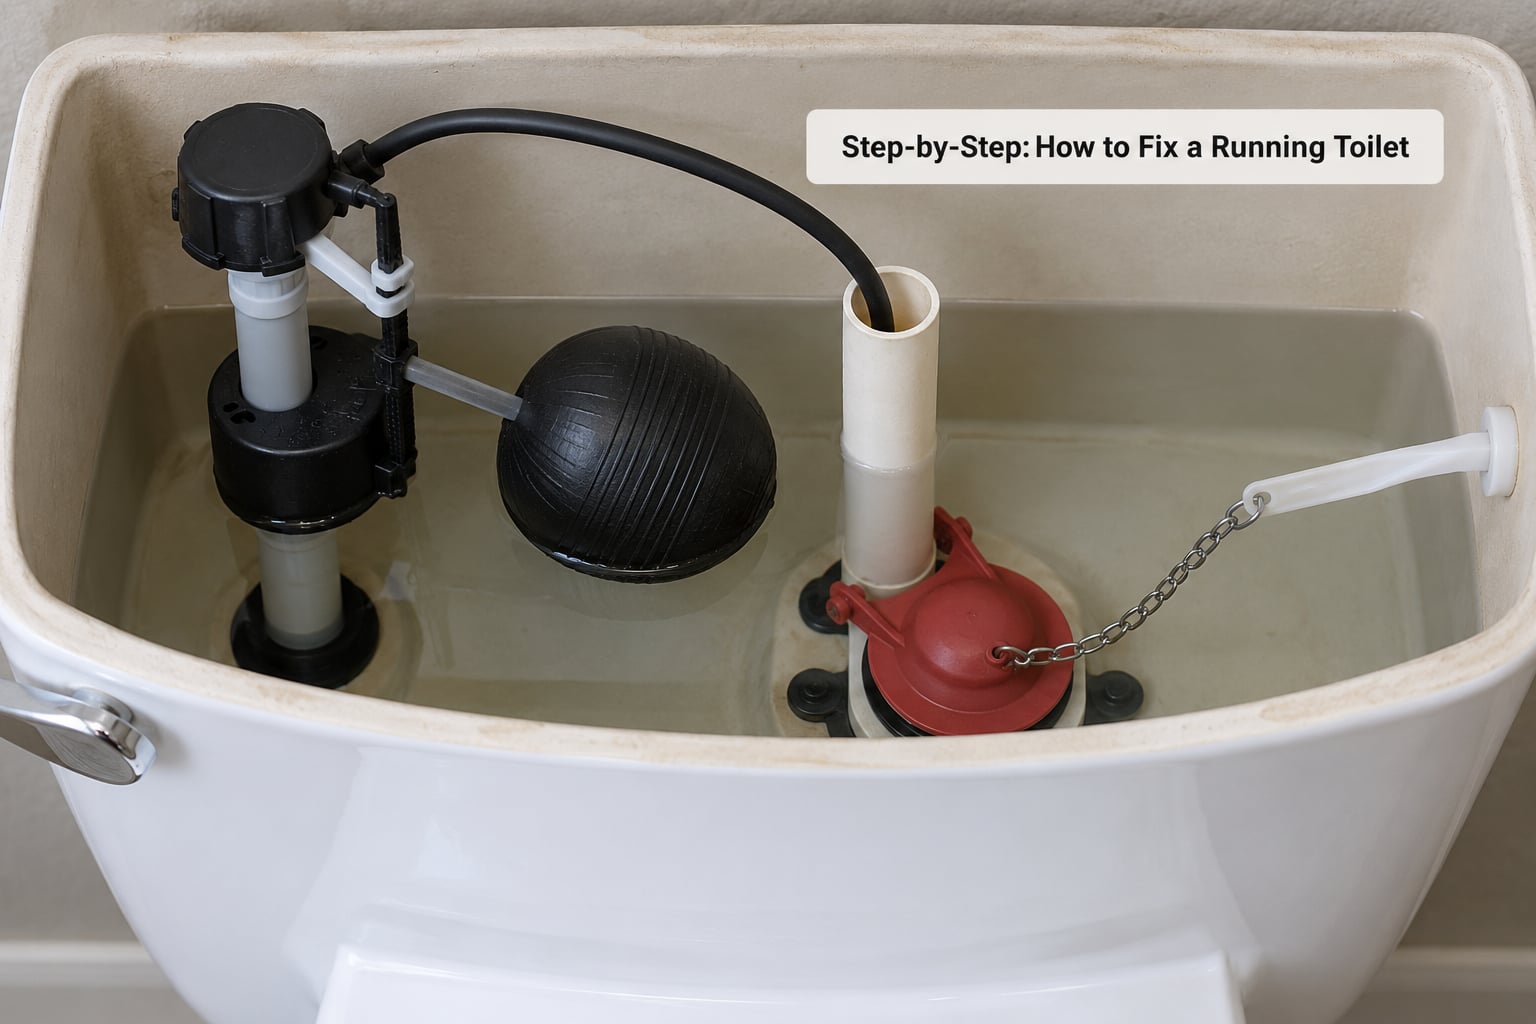
Work from the outside in: water level, flapper and chain, fill valve, float, overflow tube, handle. Follow that sequence and you’ll fix the fault rather than swapping parts at random.
1. Remove the Tank Lid and Check the Water Level
Shut off the water at the angle stop valve behind the toilet, turning the small knob clockwise until it stops. Then flush once and use a wet/dry vacuum or a cup to empty the tank so you can work on it dry. Set the lid on your towel rather than on the floor.
While the tank is empty, look at the top of the overflow tube and note where the water line sat. If it was level with the overflow tube or spilling into it, the float or fill valve is set too high. Lowering that level fixes a surprising share of running toilets on its own, and it prevents the problem from returning. Before you lift the lid, one quick check is worth it: some tanks have a lid that catches the chain on its lip or presses the flush button as it settles, which produces a “running” toilet with a perfectly good flapper.
2. Inspect the Flapper and Flapper Chain
Turn the water back on and let the tank fill, then push the flapper down and hold it for ten seconds. If the running sound stops while your hand is on it, the flapper is your fault. This is the single most useful test in the whole job and it’s the one plumbers and forum regulars both reach for.
Once you’ve confirmed it, pull the flapper off the flush valve and look at it. A good flapper is pliable rubber or solid plastic with a clean sealing edge. Warping, a curled edge, a chalky crust of mineral deposit, or corrosion on the hinge means replace it. Wipe the seat clean and check whether the flapper ever slides too far off-center — that is a warped part, not a dirty one.
Now look at the chain. It needs slight slack, roughly a quarter inch of play, when the flapper is seated. A chain that is too tight holds the flapper a hair off its seat and it drips forever; a chain that is too long slips under the flapper and the handle pulls nothing. Either way, the fix is the same: shorten the chain with wire cutters, or swap the flapper for one that came with the correct length. If you trim the old chain, reattach it with a new link so an old stiff link can’t snap.
Sizing matters more than people expect. Flappers are sold for 2-inch and 3-inch flush valve seats, and a universal flapper covers most 2-inch setups. Measure the diameter of the flush valve opening before you buy, because a flapper that is too big rocks and never seals and one that is too small falls through. If the flapper looks fine and the chain looks fine, drop a few drops of food coloring into the tank and wait ten minutes without flushing. Dye in the bowl means a silent leak past a flapper that looks closed, which points to a warped or undersized part rather than to the chain.
3. Test or Replace the Fill Valve
Lift the float arm or squeeze the float cup upward and hold it. If the water stops flowing the moment you do, the fill valve is failing to shut off and you can stop looking anywhere else. If lifting the float doesn’t change anything, the fill valve is closing correctly and your problem is the flapper or the water level.
Try cleaning before replacing. Take the valve off, rinse it in warm water, and soak the cap and the seal in a solution of white vinegar and water for an hour if you live in hard water. Forum plumbers report that debris as small as a grain of sand is enough to hold a valve open, and a rinse clears it far more often than people expect.
If cleaning doesn’t do it, replace the valve with one that matches your tank height. Measure from the inside of the tank floor to the top of the flush valve and pick a valve that sits at or below that height. A valve that is too tall is the single most common bad-part outcome: the handle or button can no longer lift the flapper, and you’ll report that the new valve won’t flush unless you hold the lever down the whole time.
While you’re in there, check the refill tube. It clips onto the overflow tube and sends a small stream down into the bowl to restore the water level after a flush. If it’s kinked, disconnected, or hanging loose and long enough to siphon, the tank can drain down and trigger the fill valve again in a loop that sounds exactly like a leak.
4. Adjust or Replace the Float
The float is the part that tells the fill valve when to stop, so it sets the tank’s water level. Set the level to about half an inch to one inch below the top of the overflow tube and the problem usually disappears.
On a float cup toilet, squeeze the spring clip on the cup and slide the cup down one or two notches on its rod, then let go until it clicks. On an older ball float, loosen the locknut on the float lever arm, lower the ball toward the flush valve, and tighten the nut again. Neither adjustment takes more than a minute, and neither requires any water in the tank, so leave it empty while you work.
If the float stays where you put it, check for a bent rod or grit under the cup. If the float is a hollow plastic ball that sloshes when you move it, it has taken on water and no longer sinks properly — replace it. Waterlogged floats hold the valve open just long enough to drip, which is why these toilets often run only when the house is quiet and nobody flushes for a few hours.
5. Check the Overflow Tube and Flush Valve
Fill the tank and watch the overflow tube. Water spilling into it means the tank level is above the tube’s rim, which is either a float set too high (step 4) or a flush valve opening that doesn’t seal under the flapper. Those two causes look identical from the outside, so check the water line against the critical level mark on the fill valve before you take anything apart.
On toilets where the flush valve stands taller than the tank needs, the overflow tube can be cut down to a lower height so the correct water level no longer reaches it. A hacksaw does it in a couple of minutes. This is a real, permanent fix for tall-tank designs, but measure twice — cut too low and the toilet has no overflow path at all, which is a much worse problem than the one you started with.
On button-flush, dual-flush, and flapperless toilets there is no flapper to reseat. The flush valve seats through a seal inside the tank, and the repair is usually a new seal or a whole replacement canister rather than a rubber flapper. If your toilet has a float cup that slides down a wide overflow tower, that tower is the flush valve, and the same diagnosis applies: correct water level and a clean seal will stop the running.
6. Inspect the Handle and Flush Mechanism
The handle and its linkage do not usually cause a running toilet, but they cause the appearance of one. Check that the handle arm is still tight on the handle nut and that the chain is actually connected to the arm. A loose handle arm lets the chain hang slack, so the flapper lifts halfway and settles back down, and the flapper can look faulty when the handle is the problem.
On a push-button or dual-flush toilet, press and hold the button down during a flush. If the button held down flushes normally, the actuator rod or the button itself is out of adjustment; if it still runs with the button held, the fault is upstream in the flush valve, seal, or float. Buttons also stick with mineral buildup and are worth a wipe before you go further.
Give the tank one more look for anything that shouldn’t be in it: a dropped bolt, a washer, a bottle of cleaner. Debris caught between the flapper and its seat will keep it from sealing no matter how many times you adjust it.
7. Test the Repair and Check for Leaks
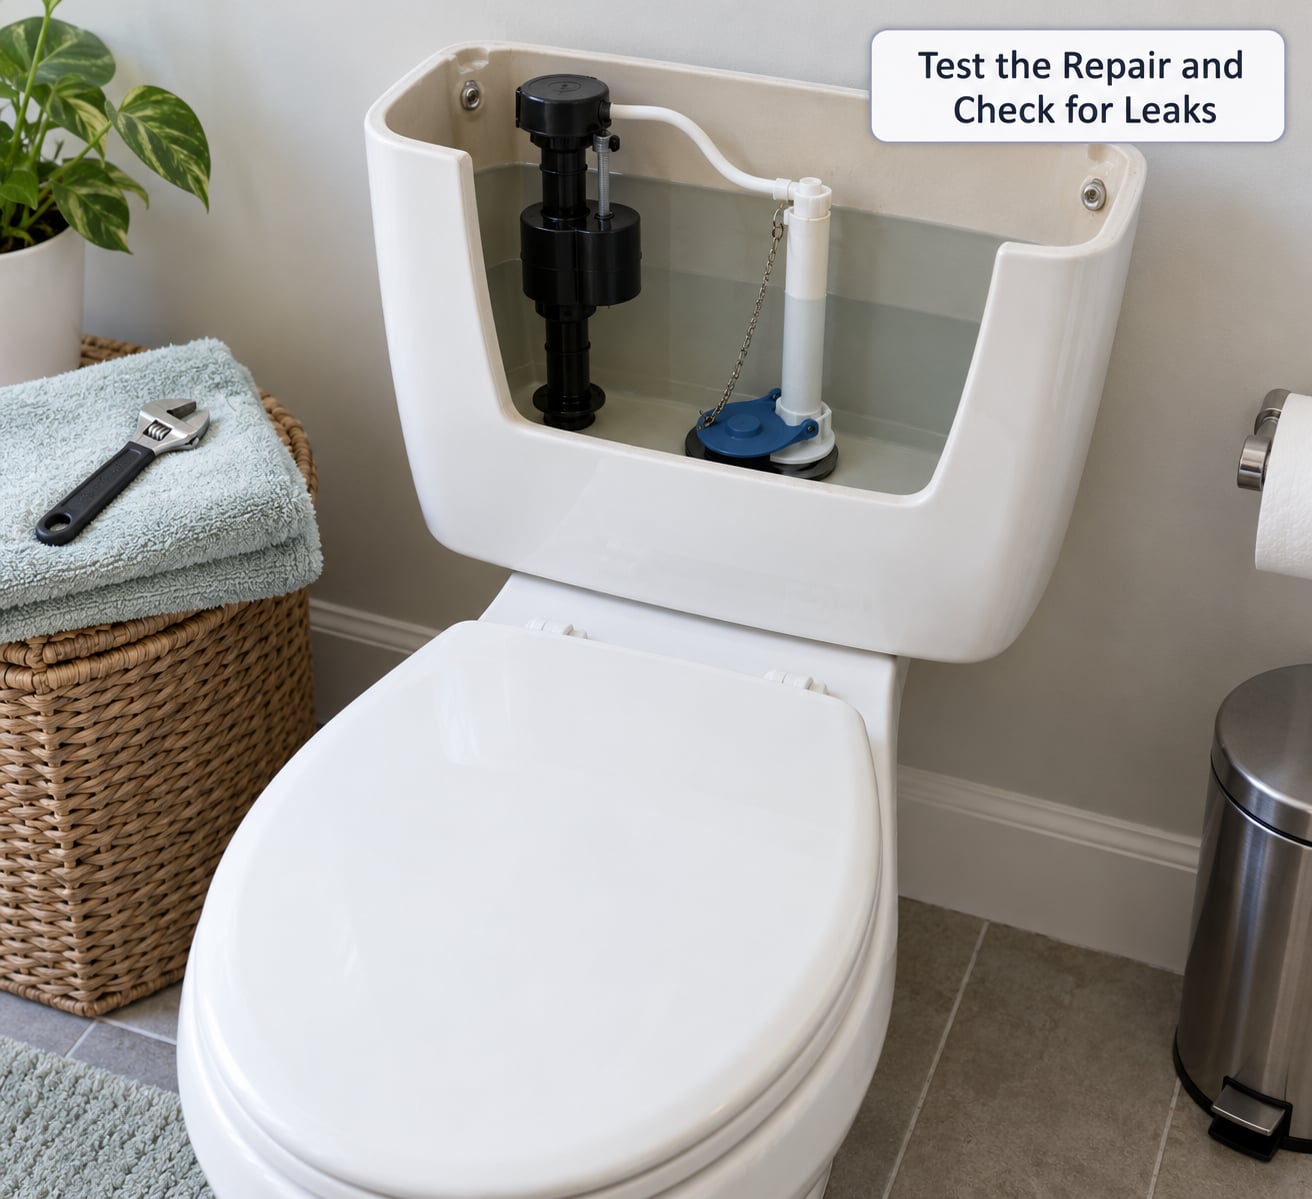
Turn the angle stop valve back on slowly and let the tank fill with the lid off so you can watch. The fill valve should stop within a few seconds of the float reaching its set height. Then put the lid back on, flush, and stay in the room for at least two minutes. Listen for the hiss to stop and stay stopped — that hiss is the fill valve doing its job, and it’s normal to hear it for a few seconds while the tank refills. What isn’t normal is hearing it again after the tank is full.
While you’re watching, wipe the tank floor, the fill valve nut, and the connection at the wall with a dry paper towel. A damp towel there means a slow leak that a paper towel will show long before it becomes a puddle. Then check the floor around the base of the toilet, especially along the joint where the bowl meets the tile.
That last check matters because a wet floor is a different job entirely. A running toilet leaks over the flapper and into the bowl, where you see it but the floor stays dry. Water pooling around the base means the tank-to-bowl gasket has gone, or the wax ring under the bowl has failed, and neither is a flapper or float fix. Put a dry towel down, flush, and if it’s wet within an hour, call a plumber and stop using the toilet in the meantime.
Common Mistakes
Most repeat failures come from the same handful of errors, and every one of them has a simple correction:
- Setting the float too low. You fix the running and create a weak flush with a low bowl water level. Set the tank to half an inch to one inch below the overflow tube instead.
- Leaving the chain length alone after replacing the flapper. A new flapper often comes with a different chain length or a stiffer chain. Re-check the slack so the flapper can seat fully.
- Buying a fill valve that’s too tall for the tank. The new valve won’t fully open the flush valve, and the toilet won’t flush unless you hold the lever down. Measure the tank height before buying.
- Over-tightening the fill valve nut or the supply line. Snug plus an eighth of a turn is plenty. Cracking a porcelain tank or stripping a plastic nut turns a fifteen-minute job into a tank replacement.
- Replacing the flapper without checking the flush valve seat underneath. Old plastic seats get an oval shape or a chalky crust. Clean it, and if it’s worn, the flush valve seat is what needs replacing.
- Catching the chain under the tank lid. A lid sitting slightly off can pinch the chain or press the flush button, giving you an intermittent “running” toilet with nothing broken.
- Using drop-in bleach tablets or in-tank cleaners. Constant bleach exposure degrades rubber flappers and fill valve seals, so the toilet you just fixed starts running again in a few months. Keep the cleaning products in the bowl.
- Leaving the supply line connection slightly loose after reassembly. Hand-tight plus a quarter turn, then dry it off with a paper towel and check again in an hour.
Once it stops, spend two minutes a year on it: flush and listen for a full minute, check the chain slack, confirm the water line sits below the overflow tube, and look under the tank for dampness. That’s the whole maintenance routine, and it catches a failing flapper before it ever reaches your bill.
Frequently Asked Questions
Why is my toilet running constantly after flushing?
A toilet that runs continuously after a flush is losing water past the flush valve or never shutting the fill valve off. Press the flapper down while it runs: if the sound stops, the flapper or chain is the fault. If it keeps running, lift the float arm or squeeze the float cup up, and if the water stops there, the fill valve or float is the problem.
How much water does a running toilet waste?
A continuously running toilet can waste around 200 gallons of water a day, which works out to roughly 73,000 gallons over a year. Toilets are generally the largest indoor water user in a home, so one neglected toilet often outweighs every other fixture you have. Even a flapper that drips slowly adds up over months.
Why does it take so long for the water to stop running after a flush?
Hearing water for several seconds after you flush is normal — that’s the tank refilling and the bowl refilling through the refill tube. A long refill usually means slow water pressure, a partly blocked fill valve, or a float set so high that the valve shuts off late. If the water never stops, the flapper or fill valve is leaking rather than refilling.
Why did my toilet start running after I replaced the flapper?
Most often the chain is wrong. A chain that is too tight holds the new flapper off its seat, and one that is too long slips under the flapper and never lifts it. Check that the flapper matches the flush valve seat diameter, that the seating surface is clean, and that the water level is half an inch to one inch below the overflow tube.
Can I fix a running toilet with a button flush or dual flush?
Yes, but the parts are different. Button-flush and flapperless models seal inside a flush valve rather than with a rubber flapper, so you usually replace a seal or the whole canister. Hold the button down while flushing: if it flushes normally, the button or actuator rod needs adjusting. If it still runs, the fault is the seal, water level, or fill valve.
Is a running toilet an emergency that needs a plumber now?
Rarely urgent. Turn the angle stop valve behind the toilet clockwise and the problem is contained until you’re ready to work on it. It’s worth calling a plumber instead if there’s water pooling around the base of the toilet, if the tank or bowl is cracked, if the shut-off valve won’t turn, or if a new fill valve still won’t flush after you’ve matched the tank height.
Conclusion
If you do one thing before anything else, turn the angle stop valve behind the toilet clockwise. That shuts the running off in about ten seconds and buys you time to diagnose it properly. Then work through the tank in order — water level, flapper and chain, fill valve, float, overflow tube, handle — testing before you buy, because pressing the flapper down while the toilet runs tells you in five seconds whether you need a two-dollar part or a different repair entirely.
Most running toilets are a chain, a float setting, or a flapper, and all three are weekend jobs. Reach for a plumber when the water is on the floor around the base rather than in the bowl, when a new part still leaves the toilet running after you’ve matched it to the tank, or when the shut-off valve itself is stuck and you can’t contain the water yourself.