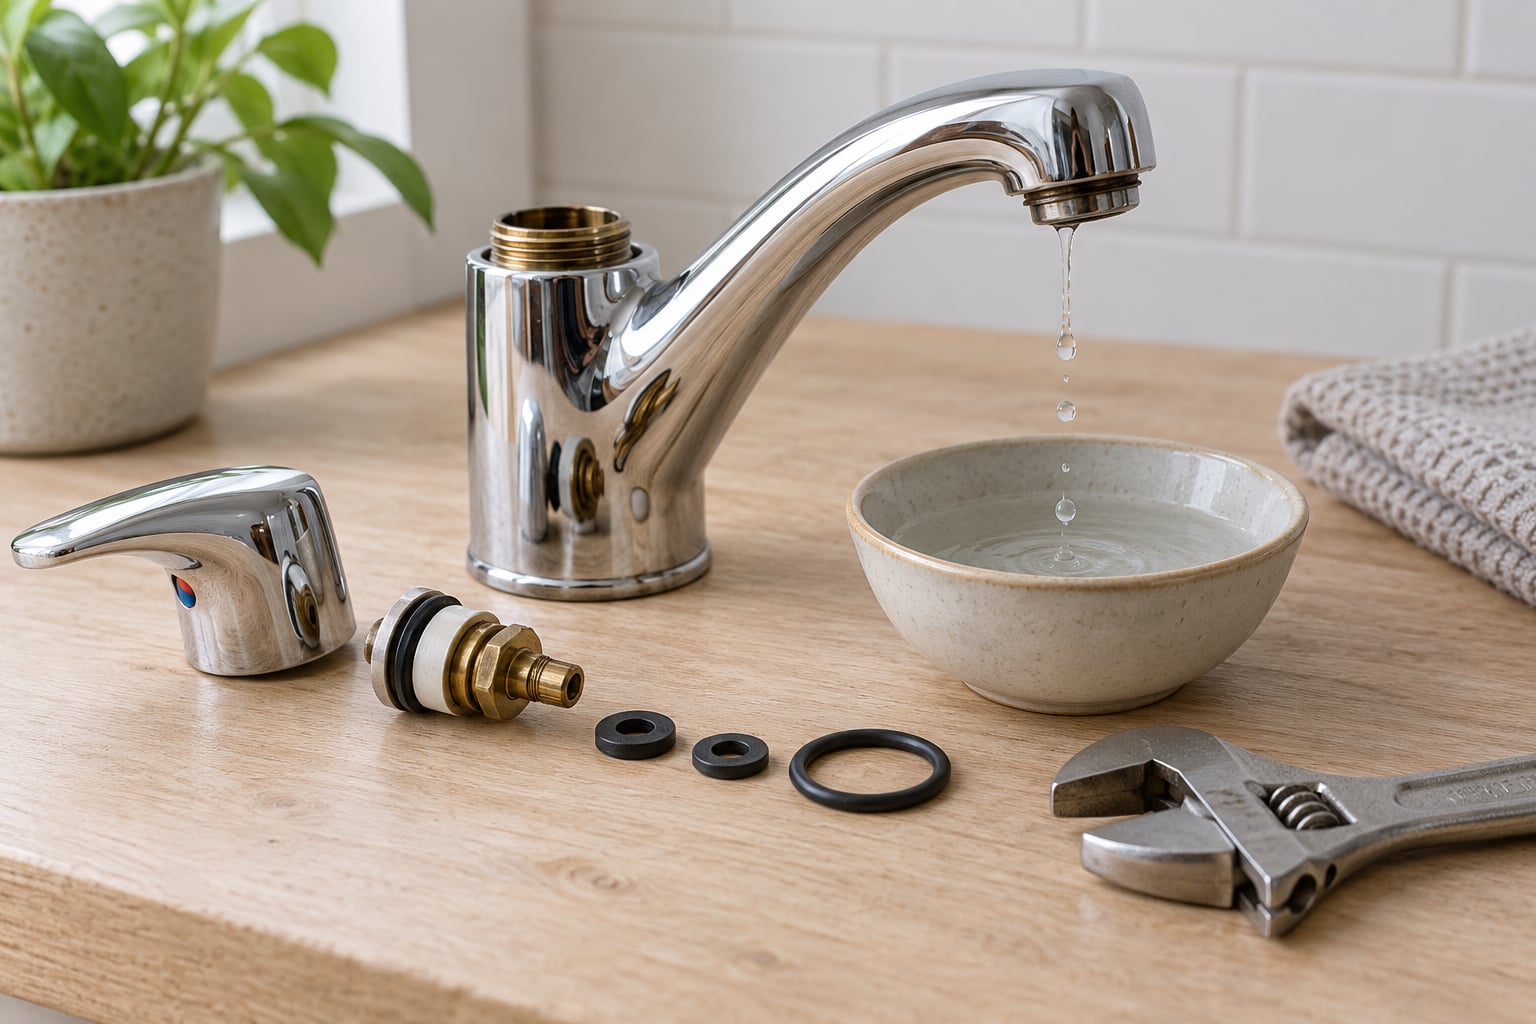
Why does my faucet drip when turned off? Because the seal that closes the water off is no longer sealing. A worn rubber washer, a hardened O-ring, a cracked cartridge or a corroded valve seat leaves a gap wide enough for residual pressure to push water out of the spout, and that drip continues long after the handle is fully closed.
The good news is that most of these repairs are small, and the diagnosis takes about ten minutes. The trick is telling a real leak apart from water that was already sitting in the spout, then matching the symptom to the right part before you buy anything.
Table of Contents
- 1Why Does My Faucet Drip When Turned Off?
- 2Is it always a bad washer?
- 3What Are the Most Common Causes of a Dripping Faucet?
- 4What Type of Faucet Do You Have?
- 5How Can You Find the Actual Leaking Part?
- 6Step 1: Confirm it is a real drip
- 7Step 2: Watch where the water comes from
- 8Step 3: Note what the handle is doing
- 9Step 4: Check temperature behavior
- 10Step 5: Check the aerator
- 11Step 6: Look for water where it should not be
- 12Can You Fix a Dripping Faucet Without Calling a Plumber?
- 13Which Repair Does Your Faucet Need?
- 14When Should You Call a Plumber Instead?
- 15Frequently Asked Questions
- 16Is a faucet that drips one drop per second a serious problem?
- 17Why is my faucet dripping only when the handle is fully closed?
- 18Can I stop a dripping faucet by replacing the aerator?
- 19Why does a bathroom faucet drip even after I replace the cartridge?
- 20Is it normal for a faucet to drip for a few minutes after it is turned off?
- 21Should I replace the entire faucet or just the valve?
- 22Conclusion
Why Does My Faucet Drip When Turned Off?
Turning a faucet handle off closes an internal valve against a seat or a rubber seal. That seal is the only thing standing between your water pressure and the spout, so when it ages, cracks, hardens or shifts out of place, the valve never reaches a complete seal. Water pressure in the line keeps pushing, and the smallest remaining gap produces a slow, steady drip.
That is also why the drip often looks worst right after you close the handle. Pressure is highest at the moment of shutoff, and it takes a moment for the water above the seal to drain through the gap.
Is it always a bad washer?
No. The washer is the most common failure on older two-handle compression faucets, but single-handle cartridge faucets almost never use one. They fail at the cartridge or the O-ring instead, which is why swapping parts blindly tends to waste a trip to the hardware store.
What Are the Most Common Causes of a Dripping Faucet?
Five failure points account for nearly every drip with the handle off. Each one produces a slightly different symptom, which is how you tell them apart.
Worn-out washer. A flat rubber washer sits on the end of the valve stem in a compression faucet and presses up against the valve seat to shut the water off. It is designed to flex every time you turn the handle, so it flattens, cracks and hardens long before anything else on the faucet wears out. A faucet from the 1950s through the 1970s is the classic washer candidate.
Hardened O-ring. The O-ring is a rubber gasket that seals the cartridge or the valve body where it meets the spout. It is the cheapest and fastest part to replace, and it is the first thing to check. O-rings fail on faucets of any age, especially on pull-out spray kitchen faucets where the spout swivels constantly.
Damaged cartridge. A cartridge faucet, whether single-handle or ceramic disc, has a sealed cartridge that rotates to open and close both temperature and flow. Inside it are small O-rings and a washer, and once the housing itself cracks the whole part has to go. A cartridge also tends to shift slightly over time, which is why some cartridge faucets drip only at one handle position.
Corroded valve seat. The valve seat is the metal rim the stem or washer presses against. On old brass faucets with years of hard water, the seat pits and wears unevenly, so no matter how good the new washer is it cannot seal against a groove. Scratching and reseating the seat with a seat tool sometimes works; often it does not.
Mineral scale and debris. Hard water leaves a chalky deposit on seats and inside the spout. White vinegar soaked for a few hours can loosen it. Debris from a cartridge breaking up can also lodge in the seat and hold a gap open, which is why a faucet can start dripping a month after a cartridge replacement.
High water pressure is worth a mention as a contributing factor rather than a cause on its own. Pressure that is higher than the faucet was rated for wears seals faster, so a new washer stops the drip for a few months and then it comes back. Plumbers in r/Plumbing and r/HomeImprovement frequently point to a pressure-reducing valve as the fix for a faucet that keeps failing.
What Type of Faucet Do You Have?
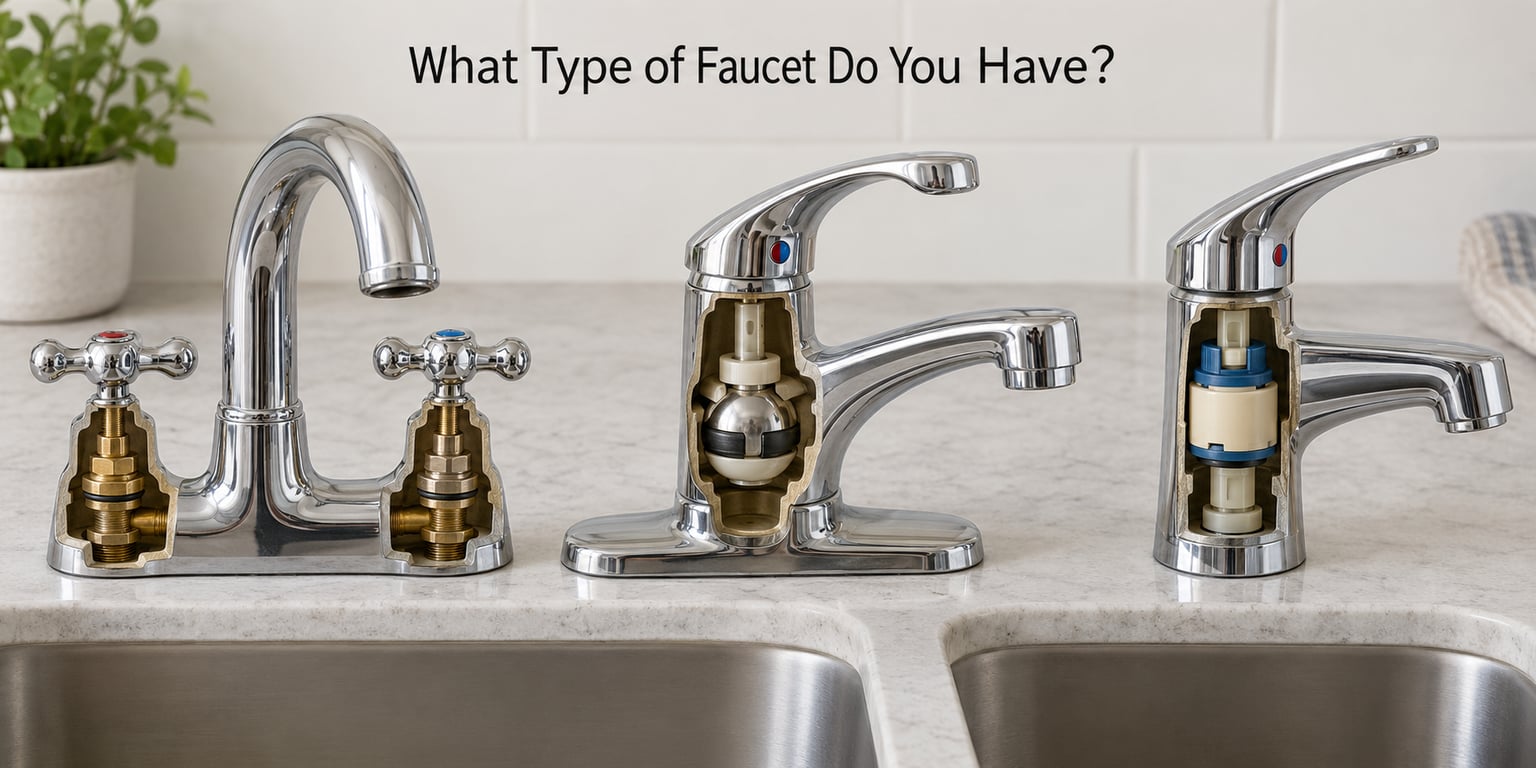
Identifying the type first is what saves people from buying the wrong part. It takes ten seconds and it decides everything that follows.
Single-handle ball faucet. One lever on top of a rounded body, usually with hot and cold indicator buttons on the cap. Inside is a brass or plastic ball with a seal on the bottom. It is also the most common faucet installed from the 1980s through the early 2000s.
Single-handle cartridge faucet. One lever, but a flatter, boxier body, often with a collar you can see under the handle cap. It has no washer you can reach, only a replaceable cartridge and an O-ring. If your handle has a temperature mark printed or stuck on it, it is almost certainly a cartridge faucet.
Two-handle compression faucet. A separate hot and cold handle, often cross-shaped or lever-style, with wide-set bases. Each handle has its own washer. This is the design that most often needs a washer replacement.
Ceramic disc faucet. Two handles that feel smooth and have no perceptible grit or wobble when turned. Inside are two ceramic plates that slide against each other. These rarely drip from wear; when they do, the cartridge or the rubber O-ring at the base is the culprit.
Most manufacturers stamp a brand and model number somewhere on the body or under the handle cap. Photograph it before you start, because that number gets you the exact cartridge or part number rather than a guess.
How Can You Find the Actual Leaking Part?
Step 1: Confirm it is a real drip
A faucet that drips for a minute or two and then stops is usually not leaking. That is water already sitting above the seal, above the flow restrictor, or in the spout bend, draining out. Most people mistake this for a leak and go looking for parts that are fine. Wait ten minutes with the handle closed and a paper towel under the spout before you decide.
Step 2: Watch where the water comes from
Water from the spout outlet means a seal inside the faucet is failing. Water around the base of the faucet or seeping out under the handle is a different fault entirely, usually the O-ring or the packing nut, and repairing the spout seal will not fix it.
Step 3: Note what the handle is doing
If the drip only appears at one specific handle position, and moving the handle a fraction stops and starts it, that points to a cartridge or a stem that has loosened in its body. Drip that is steady no matter how the handle sits is more likely a washer or a seat.
Step 4: Check temperature behavior
A faucet that drips from both the hot and cold side at once usually has a shared part failing, such as the O-ring where the spout meets the body. A single side dripping points to that side’s own valve assembly.
Step 5: Check the aerator
The aerator is the small round screen screwed into the end of the spout that mixes air into the flow. Unscrew it and look. Mineral-crusted holes make the stream spray and can fool you into thinking water is running when the handle is closed. A dripping faucet that only drips through the aerator may just need the aerator cleaned or replaced.
Step 6: Look for water where it should not be
Wipe the supply hoses and the shutoff valves under the sink dry, then check them a few minutes later. A damp braided supply line or a weeping angle stop produces a drip that people blame on the faucet for months. It is a separate repair and the fix is different.
Can You Fix a Dripping Faucet Without Calling a Plumber?
Yes, for most of the causes above. Before you start, know that some faucets cannot be disassembled and the whole unit is designed to be replaced. If yours has no removable handle cap or no visible retaining hardware, stop there and read the manufacturer’s instructions.
1. Shut off the water. Close the angle stops, which are the oval shutoff valves on the supply pipes under the sink. Open the faucet to relieve pressure. If there are no shutoff valves, or they will not turn, close the main water valve for the house before going further. Plumbers on DIY StackExchange warn that working on a faucet with live water behind it is how a small repair becomes a flooded cabinet.
2. Protect yourself and the sink. Wear eye protection, put a towel in the basin, and keep a container ready. Small screws and springs disappear down the drain more often than people expect.
3. Lay out parts in removal order. As you take each piece off, put it in a row from first to last. On reassembly you go back down the row in reverse. This one habit prevents most repeat repairs.
4. Remove the handle. Most handles are held by a set screw under a cap with a hot or cold indicator button. Pry the cap off carefully with a thin flat screwdriver. Older faucets have the handle glued or calked in place, which is where a lot of projects get abandoned, so know your limit before you start prying.
5. Remove the retaining nut or clip. Under the handle you will find a nut, a clip or a retainer screw holding the valve assembly in. Loosen it and lift the assembly out.
6. Inspect and replace the failed part. Swap the washer or O-ring, checking that it slides onto the stem freely instead of being stretched or pushed. A wrong-size washer will not seal, which is one of the most common reasons a repair fails immediately.
7. Reassemble snugly, not tight. Hand-tighten the retaining nut, then a quarter turn with a wrench. Overtightening the packing nut is a self-inflicted cause of a drip that persists after an otherwise correct repair, and it is reported over and over in plumbing forums.
8. Turn the water back on and test. Turn the water back on slowly and check for movement, then open and close the faucet a few times and watch the spout. Check under the sink for a few minutes before you close the cabinet.
Which Repair Does Your Faucet Need?
Match what you are seeing to the smallest repair that addresses it.
If the faucet drips for a few minutes then stops: nothing is wrong. Clear the aerator, which also removes the flow restrictor that many people mistake for a fault.
If the drip is steady from the spout on a two-handle faucet: replace the rubber washer on the side that drips. Bring the old washer to the store, because an incorrect size causes a leak just like a worn one does.
If a single-handle faucet drips around the spout collar or from the base: replace the O-ring. This is the cheapest fix and the one most DIY repairs confirm on forums.
If a single-handle faucet drips only at certain handle positions, or has gone stiff: replace the cartridge. If a new cartridge still leaves a spout drip, the second fault is usually the valve seat or another worn seal, not the cartridge you just installed.
If a ball faucet drips or the handle feels loose: replace the ball and its seals. A ball that has been rocked by a loose retaining nut wears round.
If the drip returned within months of a repair: the seat is worn or the pressure is too high. Reseating the valve seat with a seat wrench is a genuine option on brass faucets, and on anything else the practical fix is a new faucet.
Replacing the entire faucet makes sense when the body is cracked, when the threads are stripped, or when the drip came back after two different part replacements on the same unit. At that point you are buying parts to keep a faucet that is already at the end of its life.
When Should You Call a Plumber Instead?
There are jobs where the right call is a licensed plumber, and the honest answer is usually cheaper than the damage from forcing it.
Call one when the shutoff valves under the sink are missing, seized or will not close, because then you cannot isolate the water safely. Call one when the leak is at the handle or the base rather than the spout, since that can mean a failed valve body rather than a replaceable seal. Call one when the valve body is cracked, when the handle threads are stripped, or when a screw sheared off inside the casting.
Call one for supply line or shutoff valve leaks, corroded galvanized plumbing, and any work where the repair goes beyond what the faucet manufacturer describes. Frozen pipe damage needs a professional assessment too, since the visible crack is rarely the whole problem.
If you rent, check your lease first. In most places the landlord or property manager is responsible for fixture repairs and for damage caused by a failed fixture, and the cost of a service call for a drip you have been living with is not usually yours to carry.
Frequently Asked Questions
Is a faucet that drips one drop per second a serious problem?
Not dangerous, but not harmless either. A slow drip wastes water every second you live there, and the bill adds up quietly. It also means the faucet never reaches a fully closed state, which wears the remaining seals faster and usually shortens the life of the whole fixture. Fixing it early usually means a washer or an O-ring, which are the simplest repairs there are.
Why is my faucet dripping only when the handle is fully closed?
Because the closed position is exactly where the seal has to be perfect. Residual pressure in the line keeps pushing against the valve, so the smallest gap in a worn washer, a shifted cartridge or a pitted seat shows up as a drip only when the handle is fully off. If the drip appears at a partial handle position instead, that is a looser cartridge rather than a washer.
Can I stop a dripping faucet by replacing the aerator?
Only if the aerator is the problem. The aerator is the small screened cap on the end of the spout, and clogged holes can make a faucet look like it is running when the handle is closed. Cleaning or replacing it takes a minute and fixes spray patterns. But if water is dripping steadily from the spout with the handle off, the fault is inside the valve and the aerator will not touch it.
Why does a bathroom faucet drip even after I replace the cartridge?
Two faults are common on the same faucet. A new cartridge stops the handle leak and leaves the spout drip behind, because the valve seat, a second O-ring or the ball seal was already worn. It is also possible the new cartridge is the wrong size or was cross-threaded slightly on installation. Check the seat before ordering another cartridge, and take the old one to the store to match it.
Is it normal for a faucet to drip for a few minutes after it is turned off?
Yes, that is normal and it is the single most common false alarm. Water sitting in the spout and behind the flow restrictor drains out after shutoff, and on a spout with a long interior path that can take several minutes. Wait a full ten minutes with a paper towel under the spout before deciding anything is broken. Water that appears after that is a real leak.
Should I replace the entire faucet or just the valve?
Just the part, unless there is a reason not to. Washers, O-rings, cartridges and balls are all designed to be replaced without new tools, and a working faucet body is worth keeping. Replace the whole faucet when the body is cracked, the handle threads are stripped, the valve body leaks, or a new part has already failed twice on the same unit.
Conclusion
A faucet that drips with the handle off is leaking past a failed seal, and the culprit is usually a worn washer on an older compression faucet or a bad O-ring or cartridge on a modern single-handle one. Start by shutting off the supply valves under the sink, then identify your faucet type and confirm it is a real drip rather than water draining from the spout. Check the aerator and the base of the faucet before you buy any parts, and match the symptom to the smallest replacement that fits.