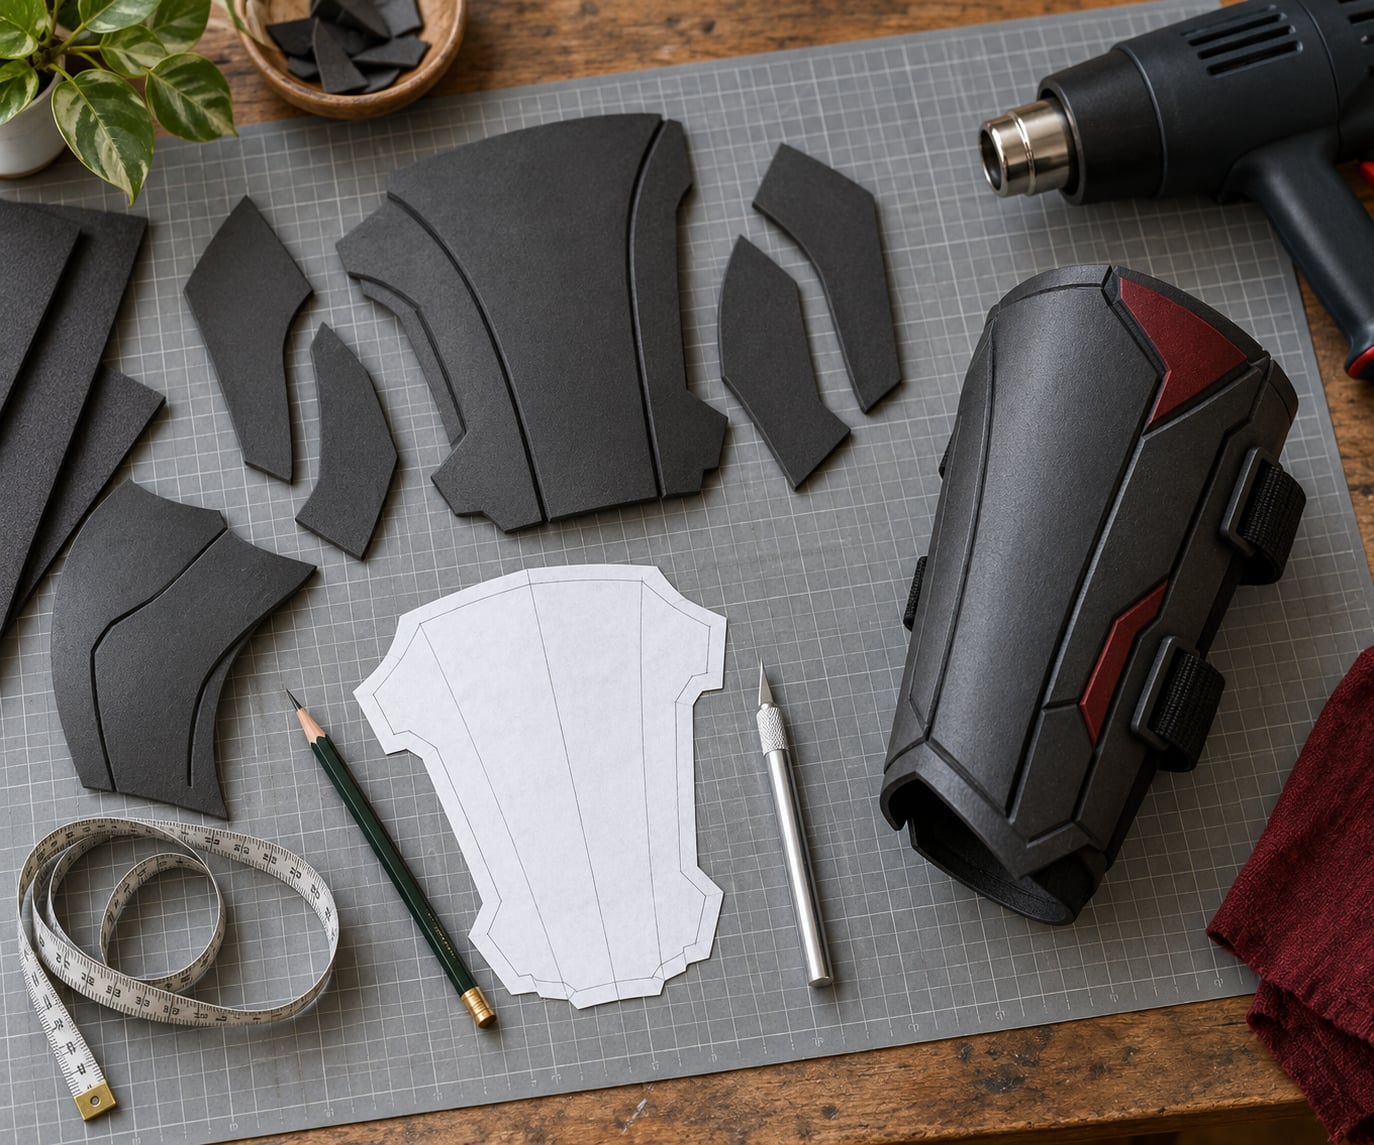
How to make foam armor at home is mostly a pattern problem, not a sculpting one: you measure the body area, cut shapes from closed-cell EVA foam, curve them with heat, glue them into a shell, then prime and paint until it reads as metal. A first forearm bracer takes an evening; a full chest-and-shoulder set takes a few weekends. No workshop, no resin, no sewing.
The whole build rests on one property of EVA foam. Heat softens it, you bend it to fit, and it cools rigid enough to hold a curve. Everything else is measuring, cutting cleanly, and gluing without gaps.
Foamsmithing, by the way, is just the hobby word for working with these thermoplastics. Once you know the handful of materials below, the process is predictable enough that you can plan a costume around what you can build.
Table of Contents
- 1What You Need to Make Foam Armor at Home
- 2The core materials
- 3Optional tools that earn their place
- 4How to pick the thickness
- 5Step-by-Step: How to Make Foam Armor at Home
- 6How to Make Foam Armor at Home: Design a Simple Pattern
- 7Transfer and Cut the Foam Panels
- 8Shape and Smooth the Edges
- 9Seal the Foam and Test the Adhesive
- 10Glue and Assemble the Armor
- 11Add Straps, Elastic and Edge Comfort
- 12Decorate and Finish the Surface
- 13Fit, Wear and Store the Armor
- 14Common Mistakes to Avoid While Building
- 15Common Mistakes and How to Fix Them
- 16Ripped or jagged edges
- 17Seams that separate or gap
- 18Uncomfortable pressure points
- 19Wrinkled or patchy paint
- 20Loose closures
- 21Frequently Asked Questions
- 22What type of foam is best for making armor at home?
- 23Can I use glue to make EVA foam armor?
- 24How long does it take to make a full foam armor set?
- 25Can I use regular craft foam instead of EVA foam?
- 26How do I make homemade foam armor fit different body sizes?
- 27Is homemade foam armor safe for fighting or impact protection?
- 28Conclusion
What You Need to Make Foam Armor at Home
EVA foam is the default material for cosplay armor, and for good reason. It cuts with a knife, curves with heat, takes paint, and weighs almost nothing against your body. The foam grades you will see at a craft store differ in density, and density decides how stiff the finished piece feels.
The core materials
- EVA foam in two or three thicknesses — usually 5mm (1/4 inch) for curved panels, 10mm (3/8 inch) for bracers and pauldrons, and 20mm (3/4 inch) for helmets and thick chest plates. The half-inch (13mm) sheets are common too.
- Paper or card for the template, plus a cardboard box to cut from if you want a thicker, stiffer pattern.
- Measuring tape, pencil, ruler and marker for transferring measurements.
- Cutting mat and a fresh craft knife with spare blades. EVA foam destroys blades, so have more than one spare on hand.
- Fine sandpaper (around 120 to 220 grit) for beveling edges.
- Flexible adhesive — contact cement or a two-part epoxy. Test it on a scrap of the same foam first.
- Scissors for trimming light material and elastic.
- Straps, elastic and buckles for wearing the piece.
- Edge binding — fabric tape, self-adhesive vinyl or thin leather stops foam edges from chafing skin.
- Protective gloves and a cutting mat, plus open windows when using solvent adhesives.
Optional tools that earn their place
A heat gun is what turns flat foam into curved armor, so it is close to essential for anything shaped around a body. Pepakura, free papercraft software, does the hard work of drafting a symmetrical pattern from a few reference images, which beats hand-drafting for anything more complex than a rectangle. Low-temp or high-temp hot glue guns are handy for temporary holds and light detail work, though they are a secondary adhesive for structural joins. Masking tape, clamps, small weights and a staple gun help while glue cures.
How to pick the thickness
The thickness question comes up constantly in cosplay forums, so here is the short version. Thin foam curves easily and layers well, thick foam holds a hard edge and resists dents. Most builders use at least two thicknesses in one costume rather than one sheet for everything.
| Thickness | Best for | Watch out for |
|---|---|---|
| 5mm (1/4 inch) | Curved chest panels, bracers layered over other pieces, gauntlet fingers | Too flimsy alone for a flat plate; edge damage shows fast |
| 10mm (3/8 inch) | Vambraces, pauldrons, kneecaps, most beginner projects | Bends in long spans; score a crease before forcing it |
| 13mm (1/2 inch) | Helmets, thicker shoulder caps, prop weapons | Hard to curve; needs steady heat and patience |
| 20mm (3/4 inch) | Chest plates, helmets, large flat panels needing a hard edge | Two blades deep per cut; heaviest to wear |
For a first build, a sheet of 10mm and a sheet of 5mm covers nearly everything you might attempt. Buy more than you think you need, because one mistake while cutting a big panel is expensive in time.
Step-by-Step: How to Make Foam Armor at Home
Below is the order I would follow. Each step ends with a quick check so you can tell whether the piece is ready to move on, rather than discovering a problem three steps later.
How to Make Foam Armor at Home: Design a Simple Pattern
Start with paper, never with foam. Measure the body area the piece covers — for a forearm, note the circumference at the wrist, mid-forearm and elbow, plus the length you want — and sketch the outline at roughly half scale on a large sheet of paper.
Draw one half of the shape against a centre line, then mirror it so the pattern is symmetrical. Armour looks wrong immediately when the two sides do not match, and mirroring by eye is where beginners go astray. Fold the paper along the centre line and trace, or use pepakura to mirror for you.
Add seam allowance now, not later. A 10 to 15mm strip along each edge gives you material to glue and enough overlap to hide a gap. Sharp internal corners get a small radius; the glue will not hold a knife-thin corner and it will tear on the first wear.
Progress check: the paper pattern should fit over your body with roughly a finger of clearance, and every line should be smooth. If the paper wrinkles or gapes when held against you, the measurements are off.
Transfer and Cut the Foam Panels
Rub one side of the foam with a marker or pencil to show the direction of the grain — lines run along the sheet from the manufacturing process, and cutting against them leaves a ragged edge. Lay the pattern on the marked face so the cut line stays visible.
Hold the pattern down with light tape. Tape pulls the surface, so stick it at the edges and keep the middle free.
Now cut with a fresh craft knife, using a cutting mat underneath and several shallow passes rather than one deep one. Sawsawing through thick foam in a single stroke crushes the material and dulls the blade in the same motion. Let each pass deepen the line, then follow it again until the waste piece drops away.
Progress check: the edge should be straight and even when you hold the panel up to the light, with no scalloped bites along the line. Two matching panels cut from the same sheet should line up perfectly along their cut edges, which is the simplest proof your pattern transfer was accurate.
Shape and Smooth the Edges
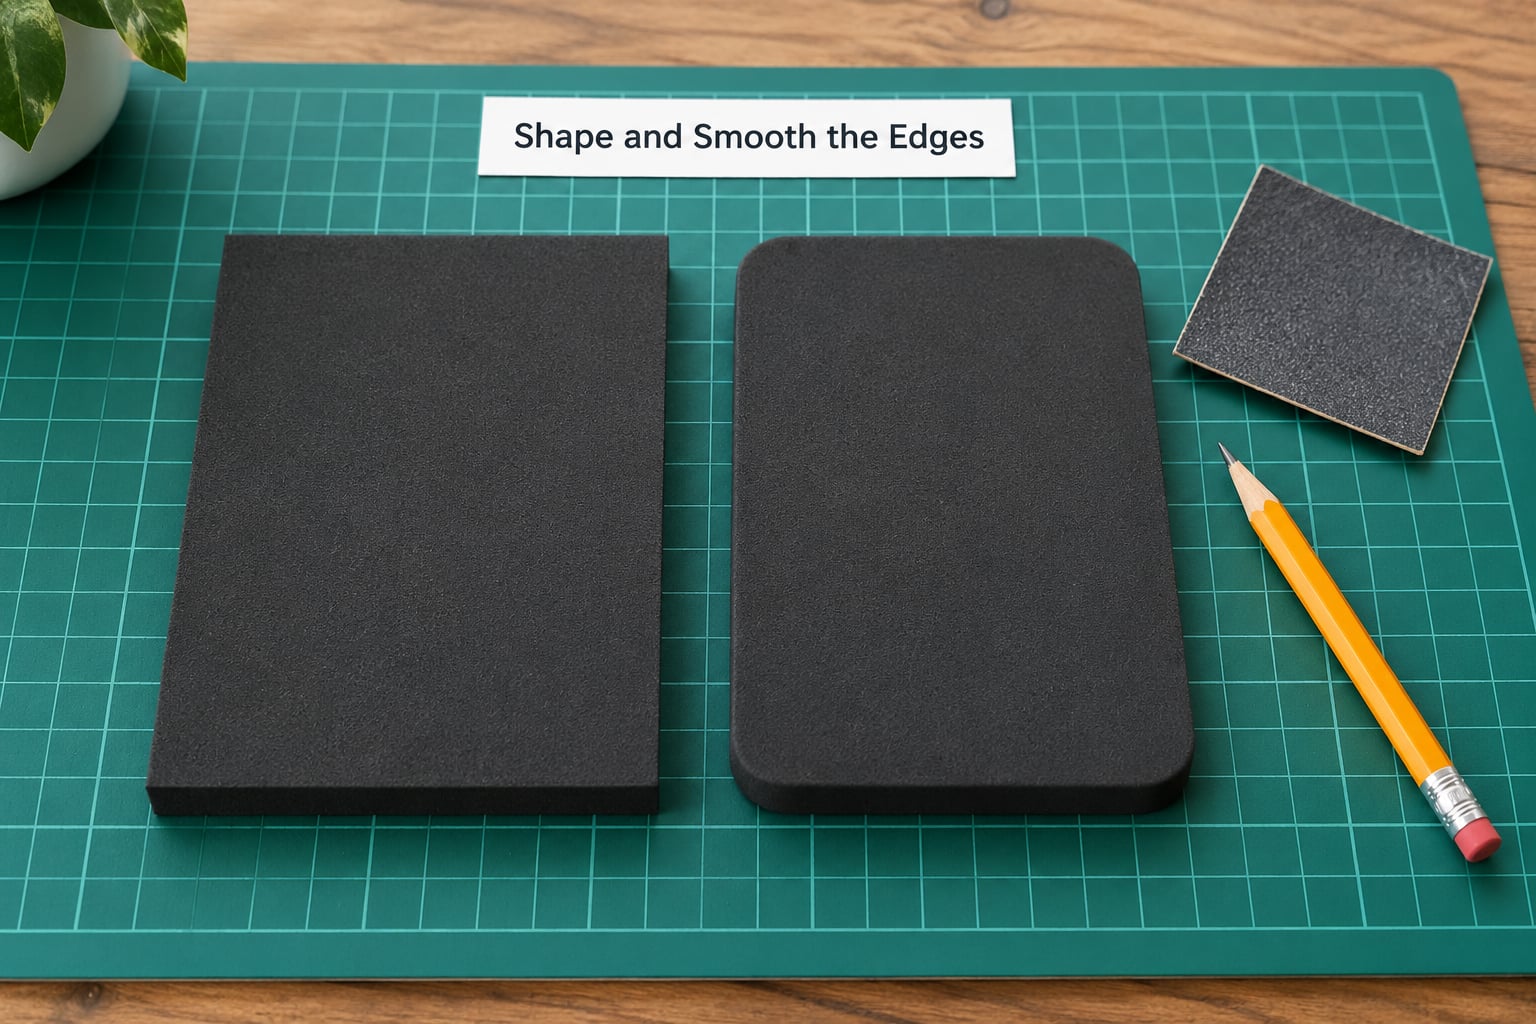
Cut foam has square, hard corners that look unfinished and dig into skin. Round them over with sandpaper, working on all four sides of a corner rather than just the visible face.
Bevel exposed edges at roughly 45 degrees so light catches them like a chamfer on real armour. Take off material in light passes and check your progress often; it is much easier to leave a corner alone than to rebuild it.
One warning: do not round edges that need to form a tight structural join. If two panels are meant to lap at a right angle, that seam line has to stay square or the glued joint will gap open when you wear it.
Progress check: run a finger along every edge. Anything that catches is still sharp enough to mark skin, so keep sanding.
Seal the Foam and Test the Adhesive
Sealing is optional but useful when the foam is porous, when you want a smoother surface for paint, or when a glue might wick into the cell structure. A thin coat of shellac-based sealer or a compatible primer works; skip it if you are in a hurry and go straight to adhesive testing.
Always test first. Put a small dab of your adhesive on a scrap of the exact foam you bought, press two bits together, wait for the full cure time, then pull them apart and look. Some glues that seem fine leave a brown stain, and some dissolve the foam into a sticky mess that never fully hardens. Better to ruin a scrap square than a finished panel.
Flexible adhesive suits EVA better than anything that sets rigid. Contact cement grabs instantly and stays slightly pliable, which matters because foam flexes every time you move. Rigid glue turns a hinged panel into a crack waiting to happen.
Work with the windows open and follow the ventilation advice on the adhesive can. Keep solvent adhesives away from an open flame or a hot heat gun.
Progress check: the bonded test piece should still bend a little without the seam splitting, and the joined area should not look wet or greasy.
Glue and Assemble the Armor
Lay out every panel on the table in assembly order before you apply anything. Dry-fitting the whole shell first is the cheapest insurance in the entire process, because it shows you exactly which tabs need trimming.
Work one joint at a time. Apply adhesive to one surface only, in a thin even layer, and spread it if the product needs that. Too much adhesive squeezes out of the seam and hardens into a visible ridge you will have to sand off later.
Press the pieces together and hold them in position. A strip of masking tape, a clamp, a rubber band or a small weight keeps the joint from creeping while the adhesive cures. Do not clamp hard enough to dent the foam.
Glue an inner tab before a visible seam when you can; tabs let you build a curved shell without fighting the panel the whole time. Let each joint reach its full cure before loading it with more stress.
Progress check: a strong, even seam shows a continuous line of adhesive with no gaps, no squeeze-out blobs and no daylight through the joint. If you can see daylight, add a shim of thin foam before the adhesive fully sets.
This is the stage where knowing how to make foam armor at home stops being theory. Everything before it is flat sheet preparation; assembly is where the piece either starts looking like armour or stays looking like cut-out shapes.
Add Straps, Elastic and Edge Comfort
Place closures where they do not sit over a high-pressure joint or a bony prominence. A strap crossing the elbow crease or the inside of the shoulder gets loaded every time you move, and it will dig in. Split the load across two narrower straps, or move the anchor point up onto a thicker shell section.
For a vambrace, run one strap around the forearm and one over the wrist. For a pauldron, use a single wide strap across the chest with a buckle or a hook-and-loop tab at the front.
Adhesive alone will not hold a strap under tension, so anchor the ends mechanically: sandwich the strap between a foam reinforcement tab and the panel, then add a rivet, a bolt, or stitches through a leather patch if you are comfortable sewing. Test every attachment by pulling hard before you paint anything.
Bind the edges next. Fabric tape, self-adhesive vinyl or thin leather wrapped around the perimeter removes the last sharp edge and makes the piece far more comfortable against skin. A thin coat of flexible seam sealer under the binding stops glue from wicking into the foam.
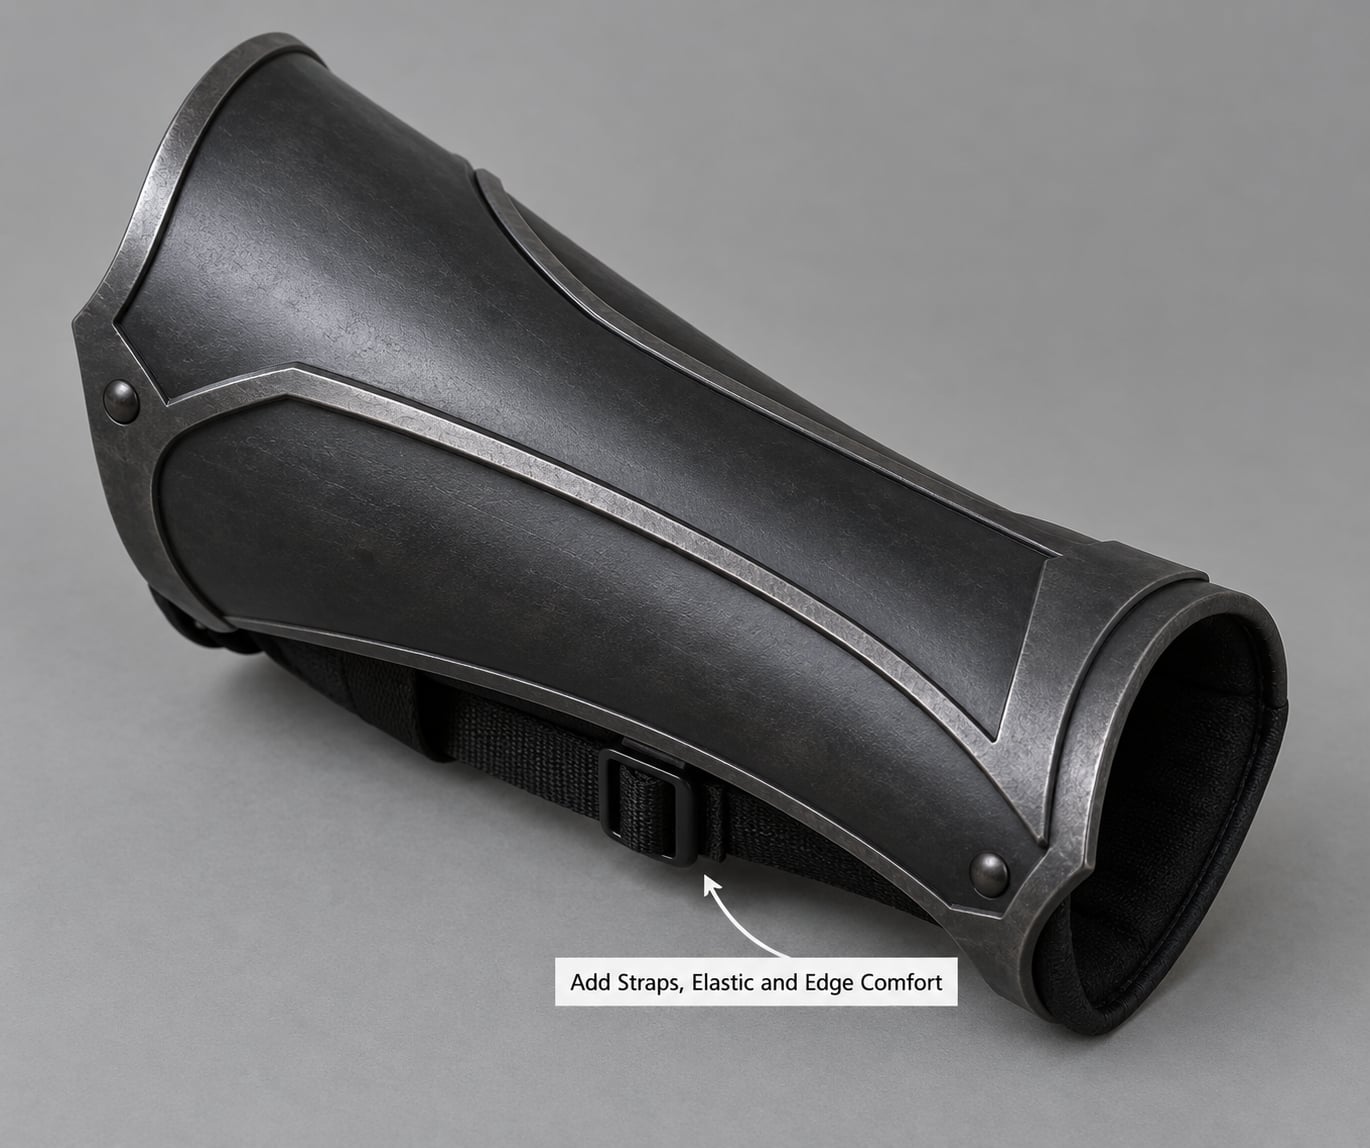
Progress check: the straps should open and close one-handed, and the piece should sit still when you shake your arm.
Decorate and Finish the Surface
Raw EVA foam takes paint badly. The foam drinks up acrylic, colours come out patchy, and the cell structure keeps reappearing through thin coats. Primer exists to solve exactly this, and skipping it is the most common reason a finished piece looks cheap.
Work in a well-ventilated space and away from anything that reacts to aerosol. Wipe the surface with a damp cloth to lift dust, let it dry, then apply a light coat of a primer compatible with your foam. Thin coats beat thick ones. Give each coat the full drying time the can specifies, then sand lightly with fine sandpaper between coats to knock down texture.
For metal effects, a dark base coat followed by a metallic acrylic brushed on in thin layers reads as worn metal. Spray metallic gives a brighter, newer finish. Gold, silver and gunmetal behave differently on foam than on plastic, so test on a scrap panel before committing to the whole piece.
Two things to avoid: sharp paint lines where a coat stops mid-panel, and a heavy finish that makes the foam rigid. Heavy coats on a flexing panel eventually crack along the crease lines.
Be realistic about what this is. Craft foam armor is a costume piece for cosplay, conventions, Halloween and staged scenes. It looks and reads as armour, and it is not impact protection.
Progress check: a good finish has even colour, no foam texture showing through, and a surface that flexes with the panel rather than flaking off it.
Fit, Wear and Store the Armor
Do the final fit with the piece fully finished, wearing the base layer you will actually use on the day. Too tight means restricted breathing and a piece you will rip off halfway through an event; too loose means it slides and snags on things.
Move through the motions you will perform. Raise both arms, reach forward, sit down, bend at the waist, and turn your head. Any strap that bites, any edge that presses, any panel that catches on a strap buckle is a problem you fix now, not on the day.
Expect a short break-in. Foam dents and takes the shape of the body over the first few hours of wear, which is fine for a costume piece, and padding under a strap or an edge helps more than tightening anything.
Store it flat or hanging at the point where the strap holds it. Folding a panel on a permanent crease cracks the coating, so avoid sharp folds. Let foam sit in a bag or a box away from hot glue and wet paint, because contact cement will transfer from a foam piece to your clothing.
Before you wear it, check the seams for any lifting, run a finger along the edges to catch any sharp spot the paint has not hidden, and confirm the straps still hold under a firm pull.
Progress check: you should be able to wear the piece for a couple of hours with no mark on your skin that does not fade within a few minutes.
Common Mistakes to Avoid While Building
Nearly every problem with a first piece comes down to one of the same handful of errors.
- Cutting against the grain. Fix: mark the sheet direction first, then cut with it. A ragged, scalloped edge is the tell.
- Forcing a single deep cut. Fix: several shallow passes with a fresh blade. It is slower and the result is far cleaner.
- Using a glue that dissolves EVA. Fix: test on a scrap, wait for the full cure, then pull it apart.
- Panels cut too tight. Fix: add clearance in the paper pattern. Foam does not stretch.
- No flex left in the piece. Fix: leave a gap at every joint or leave tabs unfilled where movement happens.
- Rigid straps on a moving joint. Fix: split the load across two anchors or move the strap off the crease.
- Sanding structural edges. Fix: keep lap joints square; round only the exposed perimeter.
- Painting without primer. Fix: prime first, always.
- Expecting foam to stop a blow. Fix: treat it as a costume, not protective gear.
A short safety checklist for every session: cut on a mat away from your body, and change the blade the moment it drags rather than pressing harder. Keep the heat gun moving and never point it at your skin. Treat hot glue burns seriously and run them under cool water. Open a window before using solvent adhesive, and keep solvents away from the heat gun.
Common Mistakes and How to Fix Them
Here is how the most common failures look once the piece is assembled, and what to do about each one.
Ripped or jagged edges
This is a blade problem, not a foam problem. A dull blade tears the cell structure instead of cutting it, and the tear runs ahead of the line. Swap the blade, mark the grain, and cut in multiple light passes. On an already damaged edge, trim back to solid material and bevel it again.
Seams that separate or gap
Too little adhesive, a surface that was not cleaned first, or a joint carrying load before it cured. Sand the joint lightly to give the adhesive something to bite, apply a thin even coat, and hold the pieces in position for the full cure time. For a seam under real stress, add a foam tab or shim behind it rather than adding more adhesive on top.
Uncomfortable pressure points
Almost always a strap placed over a joint or an edge left unrounded. Move the anchor point, split one strap into two, pad the area with a thin neoprene or fabric layer, and check the edges again. If it still bites after a few hours of wear, the panel is cut too tight and needs a wider paper pattern.
Wrinkled or patchy paint
Unprimed foam, coats applied too thick, or not enough drying time between layers. Strip back to a sound surface, prime in thin coats with full drying between each, then sand lightly before the colour coat. A finish that feels rigid to the touch is too heavy for a flexing panel.
Loose closures
Adhesive under tension will eventually let go. Reinforce the strap end with a foam tab and a rivet, bolt or stitched patch, then load-test it hard before the day. A hook-and-loop tab that keeps catching on the edge binding is usually the fix that avoids adding more hardware.
Two safety reminders worth repeating: blades go on a cutting mat, never in the air over your lap, and the heat gun needs constant movement with a clear area around it. Solvent adhesive needs ventilation and no nearby flame.
Frequently Asked Questions
What type of foam is best for making armor at home?
EVA foam is the standard choice because it is closed-cell, cuts cleanly with a knife, curves when heated and takes paint after priming. Beginners usually buy 5mm and 10mm sheets and use the thicker one for structure. Craft foam and paper-backed foam work for flat costume pieces but dent easily and cannot be heat shaped.
Can I use glue to make EVA foam armor?
Yes, but test it on a scrap of the same foam first and let it cure fully before judging. Flexible contact cement or epoxy gives the strongest, least rigid bond. Hot glue grabs quickly and is useful for temporary holds and light detail, though it can leave stringy seams and gets brittle as the piece flexes.
How long does it take to make a full foam armor set?
A single forearm bracer or pauldron takes roughly three to five hours including drying time. A chest-and-shoulder set usually takes two or three evenings of cutting and assembly plus a full day of priming, painting and drying. Most of the calendar time is curing and paint drying, not cutting.
Can I use regular craft foam instead of EVA foam?
You can, for simple flat costume pieces such as kid-safe chest plates, but it is not a straight substitute. It is thinner, dents and punctures easily, and it will not hold a heat-shaped curve. If you choose it, build the template from cardboard and glue foam to it rather than shaping the foam itself.
How do I make homemade foam armor fit different body sizes?
Draft the pattern from your own measurements rather than reusing a free template, then leave clearance at every strap anchor. Foam does not stretch, so anything cut exact will pinch within an hour. If the piece must suit several wearers, adjust the strap positions instead of the panels.
Is homemade foam armor safe for fighting or impact protection?
No. Craft foam armor is a costume piece for cosplay, conventions, Halloween and staged scenes. It dents, tears and can break on a hard impact, and thin pieces offer no real protection. Never use it for sparring, stunt work or anything where a real injury is possible.
Conclusion
Foam armor comes down to four things: a paper pattern from your own measurements, a fresh blade cutting along the grain, heat applied in short bursts, and adhesive tested on a scrap before it touches the real pieces. Get those right and the rest is finishing work.
If you are building your first piece, start with one forearm vambrace or one chest panel. Measure carefully, make the paper pattern, test your adhesive, cut on a protected surface and complete the full fit before you commit to a full set. Once the first piece fits the way you want, the second one is twice as quick.